EECE 344L Microprocessors
Laboratory 1 - MIPS Software Development
Objective: The purposes of this laboratory are to develop your MIPS programing skills and to continue to developing your proficiency in using the assembler/linker/loader system and its debugging capabilities. In this lab, you will develop assembly source that will be assembled, downloaded, and executed. The MIPS instruction set information distributed in class will be very useful for this software development process. (All class slides and reference materials are posted on UNM Learn.)
Activities: For this assignment, you will write a main routine in which at the end of execution:
v0 = the sum of odd positive integers between 1 and 1000. # calculate this sum
t0 = v0* v0 # square the sum
if( t0 has a greater value than can be represented in a 32 bit word)
v1 = -1
else
v1 = t0
Note: end your main routine with an endless loop, similar to what was implemented in Math.S
Documentation: Your lab activities must be documented following the guidelines that are provided on the course UNM Learn site. You must also demonstrate that your project functions properly to our TA, Mr. Steven Seppala, who will then sign your copy of this assignment sheet. He will notify the classes as to when he will be available in the lab to either help you, or witness your success.
Suggestion: Keep all of your files on a USB memory device as there is no guarantee that any information you store on lab machines will be preserved. On occasion, the machines must be cleaned and reloaded, so any information stored on them will be lost.
- Introduction
The objective of Lab 1 is to further develop the student’s MIPS programming skills using the assembler/linker/loader system and its debugging capabilities on the MX4ck PIC32MX460F512L (MX4k) processor board utilized from Lab 0. To do this, the student is asked to code the MIPS program to perform the following operations: (1) Calculate v0 which is equal to the sum of odd positive integers between 1 and 1000; (2) calculate t0 which is equal to v0 * v0; and (3) write the main subroutine to include an endless loop containing the “if and else” command such that if t0 has a greater value than can be represented in a 32 bit word, then v1 is equal to -1 “else” v1 is equal to t0.
- Lab Procedure/Process
The follow steps were followed to develop the MIPS programming assembly language programming. The main routine was then developed at the end of the execution.
Step 1 – Read Lab 1 and gather all required information.
Step 2 – Review lecture notes/MIPS Assembly Language Programming text book and “Math.S” for MIPS programming; also, review “How to Use MPlab” to create a new project for Lab 1.
Step 3 – Code/write MIPS programming.
Step 4 – Run debugger by establishing “breakpoints” to run software code line by line using the “step” command. Also, place MIPS programming code window and CPU register window “side by side” to observe results. Once it was observed that the programming routine ran correctly, screen shots of the results were captured for further data processing for the Lab 1 report.
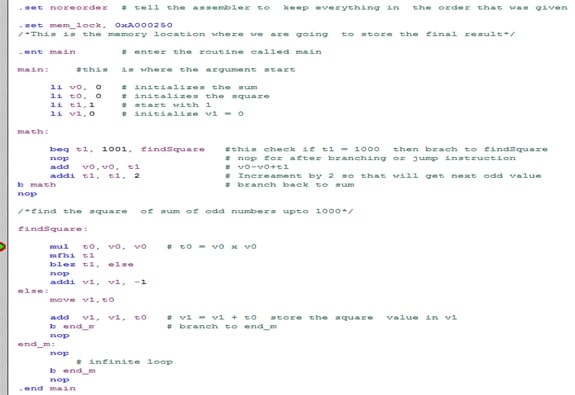
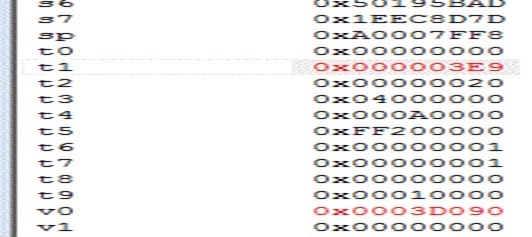
Step 5 – Insert “breakpoint” after “findSquare” command and place the CPU “side-by-side” to observe the output value of odd positive integers between 1 and 1001. See Figure 1 for the MIPS programming code and Figure 2 for the output value.
Step 6 – Inserted second break for square the sum output “mfhi, move from hi to low”. See Figures 3, 4, and 5 below to see MIPS programming and output results.
Step 7- Insert “breakpoint” to run the “if and else” MIPS programming. See Figures 6 and 7 below.

Figure 1 - MIPS programming code and breakpoint for sum of odd positive integers between 1 and 1001

Figure 2 - Output value of sum of odd positive integers between 1 and 1001

Figure 3 - MIPS programming code for square the sum of v0 and mfhi

Figure 4 - Output results for “mfhi”

Figure 5 - Output value after move from “hi”

Figure 6 - “If and else” MIPS programming code for t0 > 32 bit word

Figure 7 – V1= -1 output
- Results
The result of the CPU registers are as follows:
- Sum of odd integer from 1 to 1001; t1 = 0X000003E9
- Square sum of hi = 0x0000000E
- Square sum of low = 0x8D4A5100
- Output value after move from “hi” to t1=0x0000000E
- Output for V1 = -1
- Conclusion
Lab 1 presented several challenges that had to be resolved before the program ran correctly. First, I experienced many syntax problems since this is my first time programming using the MIPS assembly language. Though I understood that the multiplication of two register values is equal to 64 bits [by combining two register addresses: (1) 32 bit high register address value; and (2) 32 bit low register address value)], I failed to recognize this in the programming and I did not get the correct result. After I fixed this syntax, I achieved the correct results.
Second, I failed to recognize that in the calculation of the sum of odd integers from 1 to 1000, I wrote the program by starting at 1 and incrementing this value by 2 and ending at 1000. Because the program ended at “1000” which is an even number, the program did not end as expected. After some debugging, I noticed this simple error and rewrote the code to end at 1001. The program worked beautifully after this correction.
Third, I am learning that it makes a huge difference if you are not using the correct programming language/commands. For example, “mul” and “mult” mean different things and if you are not careful, you will spend hours of time debugging to determine what went wrong.
Overall, Lab 1 was simple but only after you corrected all of your programming mistakes and there were many as discussed above. Lab 1 showed that no matter how simple an exercise/problem can be, something so simple can get very complex if you are not careful. You have to pay attention to proper programming language. I could not have finished this Lab 1 without the debugging tool so it is a great tool to help me better understand what is happening “line by line” in a program routine.


