CIT 247 Lab 12 Chapters 22
Overview
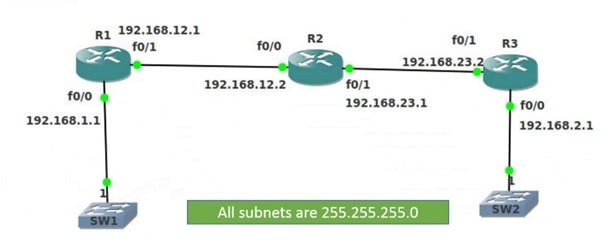
Review the diagrams at the end of this document. Note the subnets for each interface on the router. When configuring ACLs it’s important to know what subnets your router’s interface are connected to.
You will be configuring inbound and outbound ACLs on several router interfaces and performing various connectivity tests. Additionally, this will be a review of OSPF, creating GNS topologies and CLI configurations.
Setup
- Create the same topology shown at the end of the document
- Statically set each router interface with the appropriate IP address and mask
- Allow all networks to reach each other using the OSPF routing protocol
- Follow the directions in Chapter 17, your own notes and experience from Lab 11 parts 1 and 2
Helpful Hints:
- No passive interfaces on the routers
- Use the same PID and area number for all 3 routers
- Select 1 route that matches all networks in the topology.
- Use a single network ID and OSPF wildcard mask that matches the network ID, but still allows all host frames
- R1 and R3 need a username and password set to allow remote access.
- Both the username and password should be supplied for full remote access.
- Username = cit Password = 247
- Encryption does not need to be set for either router or credential
- Both the username and password should be supplied for full remote access.
- Use the extended ping command to verify the source IP address remains the same.
- When routers pass packets, the source IP in the packet will change to the router’s sending interface
- Extended ping command: ping destinationIP source sourceIP
- R1# ping 10.1.1.1 source 172.16.0.2
- The command show ip ospf interface brief returns which interfaces allow OSPF learning.
- All router interfaces should be able to learn routes
- The command no router ospf PID# clears OSPF configurations
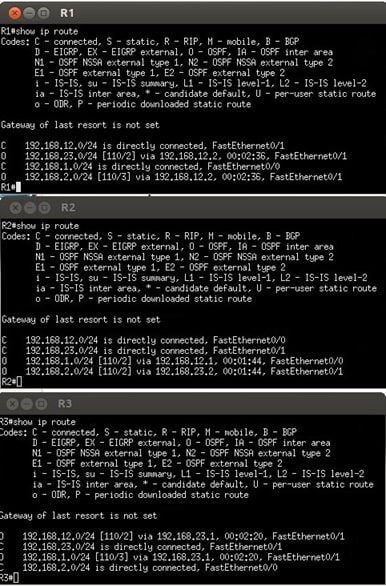
- The screenshots under the topology show the expected routing table output
- If your routing tables do not match the table in the document, there are issues with your configurations
- Remember that an implicit deny is created for every new ACL
- There should not be any messages of lost routes/interfaces down after ACLs created. Check your configurations
- To receive credit you will need to save each router configuration
- After saving all 3 router configurations, save the GNS3 topology and then upload to Blackboard through the VM.
Instructions
- Verify all devices can ping each subnet after OSPF fully loads
- The connectivity test most useful for this lab is ping
- Use ping before and after ACL creation
- After completing the ACL below, answer the questions in Blackboard
ACL Creation
- Create an extended ACL numbered 101 on R2 that denies any type of packet leaving R1 interface fa0/0 from reaching the R3 interface fa0/0
- Create an ACL on R2 numbered 102 that only allows R3 fa0/0 to Telnet into R1’s fa0/1 interface
- Create an ACL on R2 numbered 102 that prevents pings if the source is 192.168.23.2 from reaching R1 interface fa0/1
Lab Questions
Q1: What command did you enter to verify both the username and password are supplied when a user Telnets into R1 and R3
Q2: What command did you use to test the ACL to deny R1’s fa0/0 interface from reaching R3’s fa0/0 interface?
Q3: What direction and interface did you apply the above ACL on R2?
Q4: What was returned after testing if R1’s fa0/0 could ping R3’s fa0/0?
Q5: What ACL rule did you create to negate the implicit deny for your ACLs?
Q6: Explain the different between a standard ACL and extended ACL.
Q7: Explain why the direction an ACL is placed is important.
Submission
- Once you have your ACLs configured, be sure to copy the running-config file to the startup-config file on ALL Routers
- Use the ‘copy run start’ command
- When asked the filename, enter ‘startup-config’ without the quotes
- Save the entire GNS project
- Zip all the files and directories in your project directory created for the lab and submit the single file via Blackboard
- Answer the questions related to the lab and ACL creation in Blackboard
Topology

Routing Table Output


