

The power light pulses quickly the built-in demos
on accessories.
See back for details.
• Heed all warnings on iRobot Create, battery, charger and in owner’s manual.• Follow all operating and use instructions.
• Refer all non-routine servicing to iRobot.
• Always remove the battery before long-term storage or transportation.
• iRobot Create has built-in safety sensors to keep it from falling down stairs and bumping hard into walls. iRobot is not responsible for any product issues that may arise if you disable those sensors.
• Never handle chargers with wet hands.
iRobot Create Owner’s Guide
About iRobot® Create
Thank you for purchasing iRobot Create. We hope you enjoy working with it and we look forward to hearing about your experiences.
Sincerely,

Anatomy
Top View
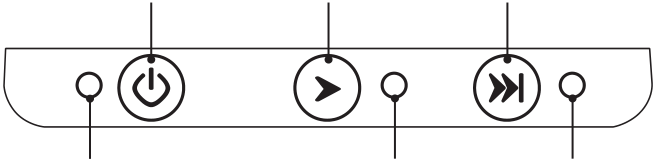
Buttons and Lights
Play
Power Button Button Advance Button
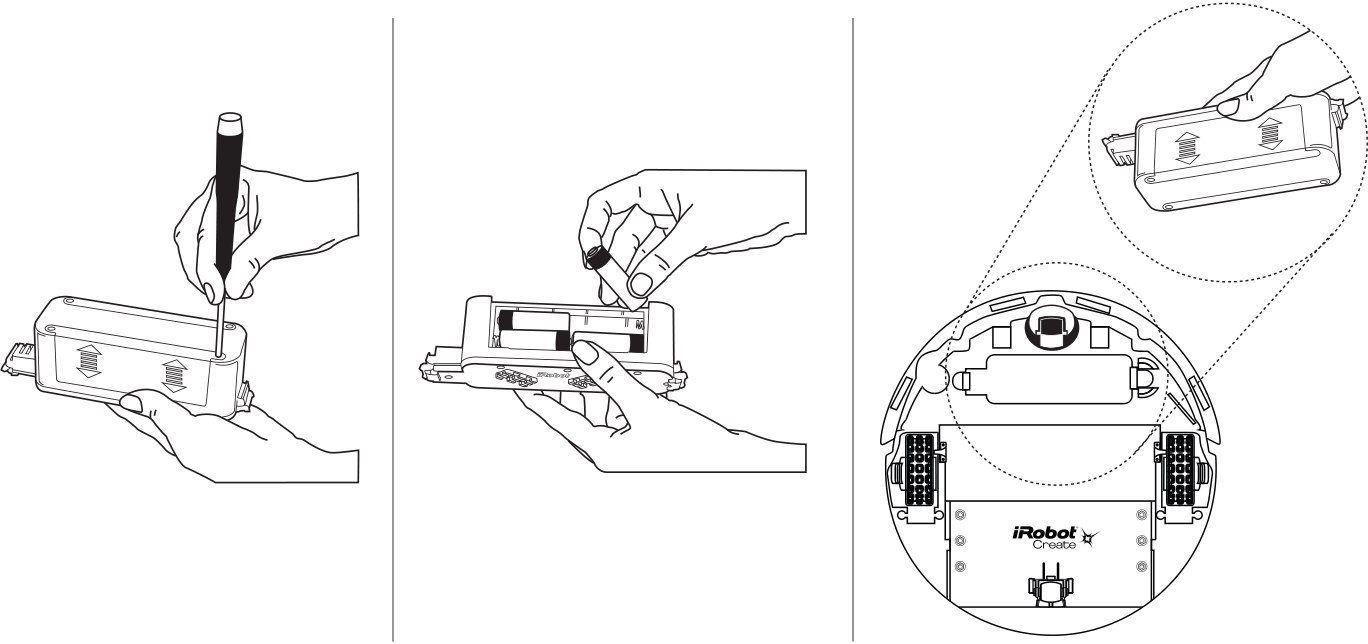
Battery
Fourth Wheel
• The Retracted wheel position (clips in place) provides iRobot Create with greater stability. This is useful if you are running iRobot Create with a payload.
• The Released wheel position (clips removed) provides iRobot Create with greater mobility. This is useful if you want iRobot Create to travel over uneven surfaces.
|
|---|
wheel angled toward the back (see figure 1). Push it in until it clicks into place. To remove it, depress the tab in front of the grooves and slide the wheel out.
• Insert pennies (or other weights) into the inside tailgate slots.
• Screw the cover back on the tailgate and screw the tailgate back on the robot.
Demos
iRobot Create comes with ten built-in demos to provide inspiration for your own robot programming adventures.
• To stop the demo, press the Play button or the Advance button.
demo descriptions
Powering iRobot Create

| wArning: do not use rechargeable AA batteries in irobot Create. use Alkaline |
|---|
iRobot Create Owner’s Guide

note: The Alkaline Battery Pack is not recommended for use in iRobot Roomba®.
Cargo Bay Connector Pin descriptions
| 10 |
|
|---|

• Song commands
• Sensor commands
The serial cable plugs into iRobot Create’s Mini-Din connector, which is located in the rear right side of iRobot Create, beneath a snap-away plastic guard.
sending Oi Commands from a PC
Connect the serial cable between iRobot Create and your PC’s serial
port and start a serial terminal program that is capable of sending data. iRobot recommends the freeware RealTerm Serial Capture Program, available at http://realterm.sourceforge.net/.
• To make irobot Create sing:
Send these command sets separately:For more information on scripts, see the section Creating a Script for iRobot Create found on page 13.
To make the robot perform more complex behaviors, you can write software that runs on the PC and sends commands to the robot while reading its sensor data. Your software can communicate with iRobot Create over the included serial cable or a wireless serial accessory (not included).

| 1 |
|
|---|

using the script Command
To load a script onto iRobot Create, use the Script command (152), followed by the number of bytes in the script, followed by the series of commands and their arguments. Scripts can be up to 100 bytes long.example:
Drive in a square:
152 17 137 1 44 128 0 156 1 144 137 1 44 0 1 157 0 90 153
using the Play script Command
When you are ready for iRobot Create to perform the script, send the Play Script command (153). This loads the script into the serial queue. iRobot Create then immediately begins executing the script’s commands as if they had been sent directly to the serial port.
| www.irobot.com | 1 |
|---|
The Following accessories are compatible with iRobot Create:
• Virtual Walls®
Virtual wall®
A Virtual Wall creates an invisible barrier that iRobot Create will not cross by emitting infrared signals that iRobot Create sees with its Omnidirectional IR receiver. The invisible barrier can range from three to eight feet long. You can set the range of the invisible barrier by adjusting a slider bar on the Virtual Wall. To create an invisible barrier greater than eight feet wide, you may need additional Virtual Walls. To purchase a Virtual Wall, visit our website at www.irobot.com.You can also use Virtual Walls in two of iRobot Create’s built-in demos: Home and Tag. See page 6 for information on how to select and start iRobot Create’s built-in demos.
the Omnidirectional IR receiver sensor on iRobot Create with black
electrical tape. When you start the demo, iRobot Create spins until it
|
|---|
The Self Charging Home Base also enables iRobot Create to automatically charge its iRobot rechargeable battery. During two demos, iRobot Create will automatically return to the home base. During the Cover demo, if the battery is running low and the Omnidirectional IR Receiver on iRobot Create sees the Home Base IR transmitter, iRobot Create will dock itself on the Home Base for recharging. During the Cover and Dock demo, as soon as the Omnidirectional IR Receiver on Create see the Home Base IR transmitter, iRobot Create will dock itself on the Home Base for recharging. See the Demo section on page 6 for information on how to select and start a demo.
While recharging, iRobot Create’s Power LED and the Home Base Dock lights will be green.
To start a demo, press the Remote’s spot button. This button works the same as iRobot Create’s Play button.
To select a demo, press the Remote’s Max button. This button works the same as iRobot Create’s Advance button.
| This remote requires 2 AA batteries (sold separately). | ||
|---|---|---|
|
||
|
||
| 1 |
You can purchase the
iRobot Command Module at www.irobot.com.irobot rechargeable Battery Options
This kit comes with a standard rechargeable battery and a standard charger that will recharge the battery in 7 hours.
• irobot roomba APs battery and fast charger.
• The power light pulses orange while the robot is charging and turns solid green to indicate a full charge.
• For best battery performance, keep iRobot Create powered off, plugged in, or charging on the Home Base when not in use.
Troubleshooting
During the built-in demos, iRobot Create will tell you when something is wrong by blinking its Play and Advance lights rapidly and playing a two-tone “uh-oh” sound followed by beeping. Refer to the chart below to resolve iRobot Create’s problem. If the problem is not resolved,
visit www.irobot.com/support.
|
|
|
|
|
|
|
|
|
|
|
|
Index
Accessories, 1 Fourth Wheel, ,Advance button,
Advanced Power System (APS) battery, 1 16 hour refresh charge, 1
Battery Options, 1Demos, Control buttons, 1
Banjo-cheating, Script, 1
Demo descriptions, Drive-Figure-Eight,
Self Charging Home Base™, 1 Serial capture program, 11
Wimp, Wheel Clips ,
Docking iRobot Create
| 1 |
|---|
If you have questions or comments about iRobot Create, please contact iRobot before contacting a retailer.
Please visit our web site at www.irobot.com for support tips, frequently asked questions, or information about accessories and other iRobot products. We would like to hear from you.
register your irobot® Command Module today and sAVe 1% on all accessories.*
irobot Command Module
 |
|
|---|
430.06


