

The installer runs and displays the installation completed dialog
| ybook |
|
|---|---|
| Pla |
|
3. Determine the success of the attack.
4. Expose and correct weakness in the network infrastructure.
Objectives
|
1 | |
Methods
Identify
Scanning & vulnerabilities:
|
|---|
1Reference: http://www.nist |
|---|
System firewalls:
|
|---|
Passwords:
|
|
|---|
Install the universal forwarder on Windows
Download the universal forwarder software from
3. Click Install to install the software with the defaults.
4. In the Receiving Indexer pane, enter a host name or IP address and the receiving port for the receiving indexer that you want the universal forwarder to send data to and click Next.
wget -O splunkforwarder-8.2.1-ddff1c41e5cf-linux-2.6-amd64.deb ‘https://d7wz6hmoaavd0.cloudfront.net/products/universalforwarder’
To install the forwarder DEB package in the default directory /opt/splunkforwarder:
| 5 |
|---|
Install the universal forwarder on pfSense using the pkg command: pkg install splunkforwarder-8.2.1-ddff1c41e5cf-freebsd-11.3-amd64.txz
If your host has less than 2GB of memory, reduce the kern.maxdsiz and kern.dfldsiz values accordingly.
Start and configure the universal forwarder
From a command prompt on the host with the universal forwarder installed, run the command that enables that data input. The forwarder asks you to authenticate and begins monitoring the specified directory.
To monitor the /var/log directory:
sudo ./splunk add monitor /var/logTo monitor Metasploitable’s log files, mount a remote folder over SSH. From the Ubuntu with Splunk Enterprise installed, go to Files > Other Locations > Connect to Server and type in the following command:
ssh://192.168.1.101/Once you click on the connect button, type in the SSH login credentials and the remote directory will be mounted at /run/user/1000/gvfs/sftp:host=192.168.1.101 which you can access via command line or through the Files GUI.
cd pentbox
Start the pentbox ruby script with the following command:
| 7 |
|---|
Install a Splunk forwarder on this virtual machine and configure the honeypot log files as data inputs.
Download and install Wireshark on Ubuntu Install Wireshark on Ubuntu using the following command: sudo apt install wireshark
Install Splunk
You can install Splunk Enterprise on Linux using DEB packages or a tar file, depending on the version of Linux your host runs.Deb file installation
Install the DEB file using the dpkg command:
sudo dpkg -i splunk-file.deb
Follow that link to the login screen. After you log in, the Welcome screen appears.
Configure data inputs on Splunk
To start receiving data from splunk forwarders, go to Settings > Forwarding and receiving > Configure receiving > New Receiving Port.System information:
User information:
| 9 |
|---|
Recover & Remediate
Backup:Tactics
Inci
|
Blue Team should report security incidents or suspiciou esentative utilizing the incident reporting form (Appendi lved, the security representatives should update the rep (Appendix B) appropriately. The security representatives orm analysis, develop responses, and provide reporting exercise control group (ECG). e the incident has been analysed and label as real attac informed including but not limited to:
|
|
|---|---|---|
|
|
|
| 11 | ||
• Stakeholders
The communication methods available are:
of threat before authorizing the security representative to proceed.
5. The security representative may remove the threat once approved by the
| 12 |
|---|
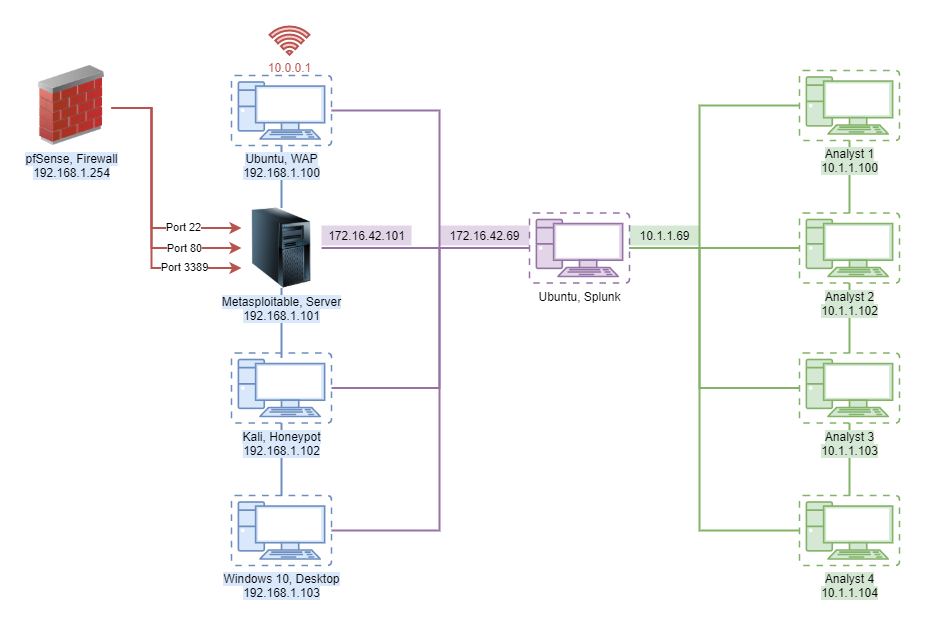
NETWORK DIAGRAM
| 1 | ||
| 2 |
|
|
| 3 |
|
|
| 4 | ||
| 5 | ||
| 6 | ||
| 7 |
|
|
| 8 |
|
|
| 15 |
|---|
| 16 |
|---|


