
The command show route displays the contents the routing table
CET327 Tutorial 2
• Explain how eBGP operates.
Why are you studying this?
| • |
|---|
|
192.168.1.1/30 |
|
||||||
|---|---|---|---|---|---|---|---|---|
|
|
|||||||
| lo2 | ||||||||
| Gi0/1 | ||||||||
| lo0 |
|
Gi0/2 | R2 |
|
R3 | |||
| Gi0/2 | ||||||||
| 10.0.0.6/30 | Gi0/4 | |||||||
| 3.3.3.3/32 | ||||||||
| 1.1.1.1/32 | 10.0.0.13/30 | |||||||
10.0.0.14/30
Gi0/1
| lo0 | R4 | |
|---|---|---|
| 4.4.4.4/32 |
P a g e 1 | 22
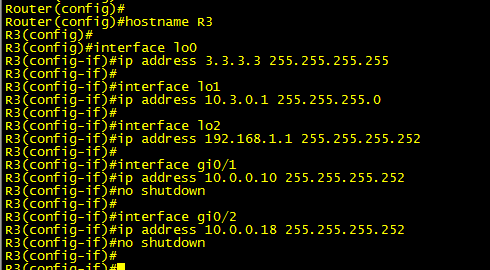
The following screenshots contain the commands required to name a router, configure loopbacks and setup your Gigabit Ethernet interfaces.
Initial configuration of R3
| • |
|
|---|
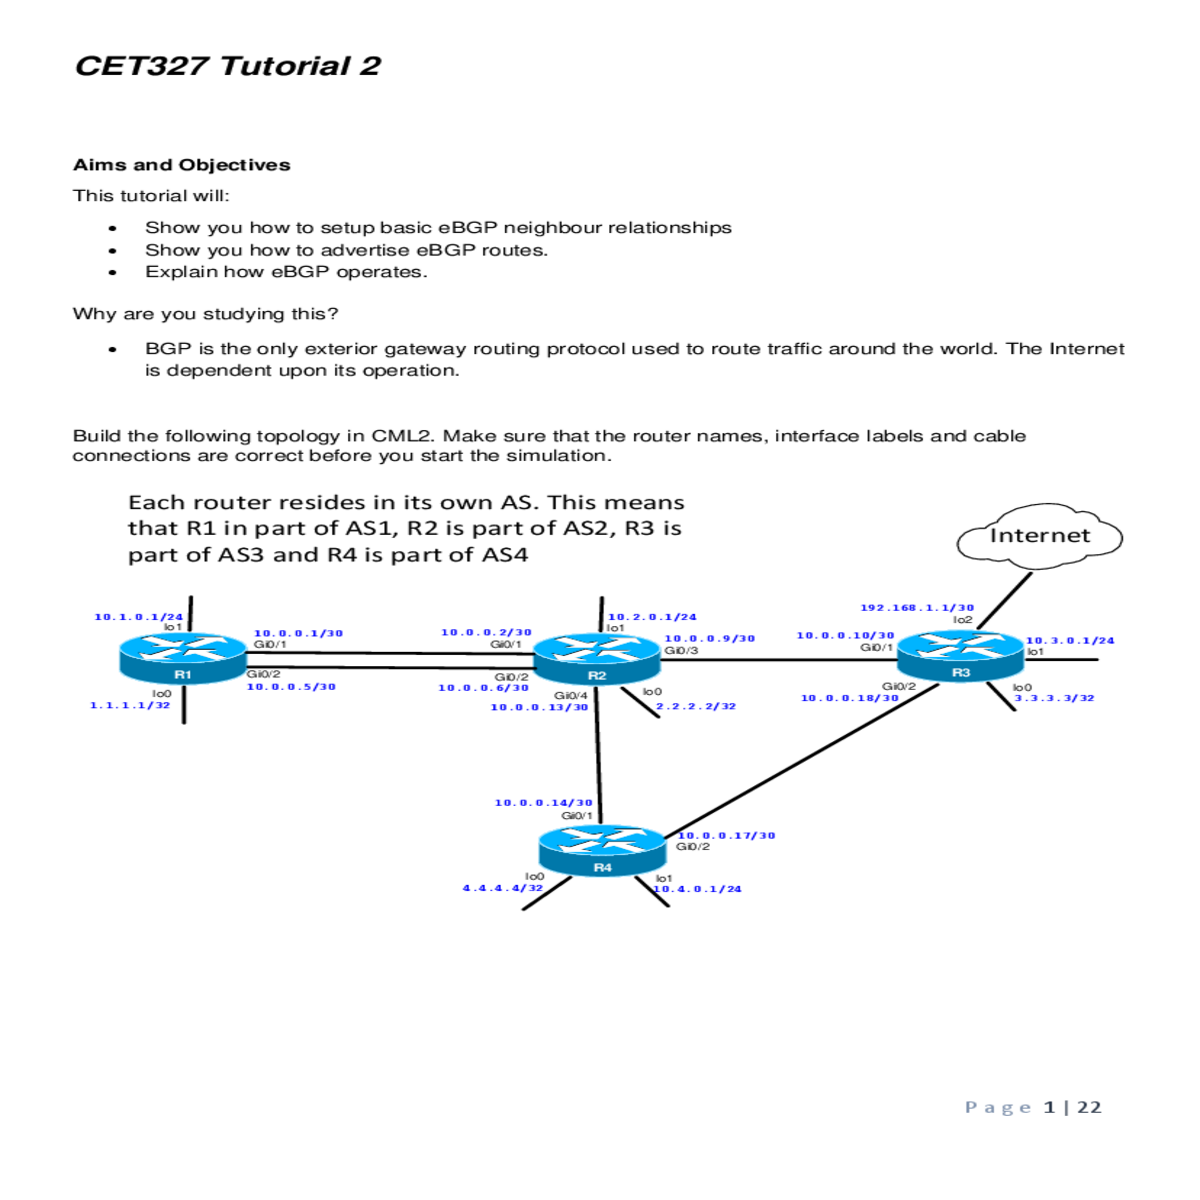
This number is called the Autonomous System Number (ASN) Each company must have its own number. The ASN in this tutorial is the router number (e.g. R1 is in AS1, R2 is in AS2, Rx is in AS x)
Notice that R2 is in ASN 2 and that it will
use its lo0 address 2.2.2.2 as its router IDThis command tells R2 that it has an eBGP
neighbour in AS 1 with IP address 10.0.0.5.
This is R1. A neighbour relationship will form
between the two routers once each device
has a matching neighbour statement.
| • |
|---|

P a g e 3 | 22
| Notice that the command displays | ||
|---|---|---|
| the Router ID and ASN of R1 | ||
This indicates that R1 has learned one prefix
(route) from its neighbour R2(10.0.0.6)
|
We are using BGP | ||
|---|---|---|---|
|
|||
| route changes and that route is | |||
|
| • | • | |
|---|---|---|
| your R1 configuration. R1 has also received one prefix(a route from R2 which is 10.2.0.0/24). The table | ||
|
||
| may see a different table version to the one shown in the screenshot above. It will depend upon whether | ||
|
||
| • |
|
|---|
P a g e 4 | 22
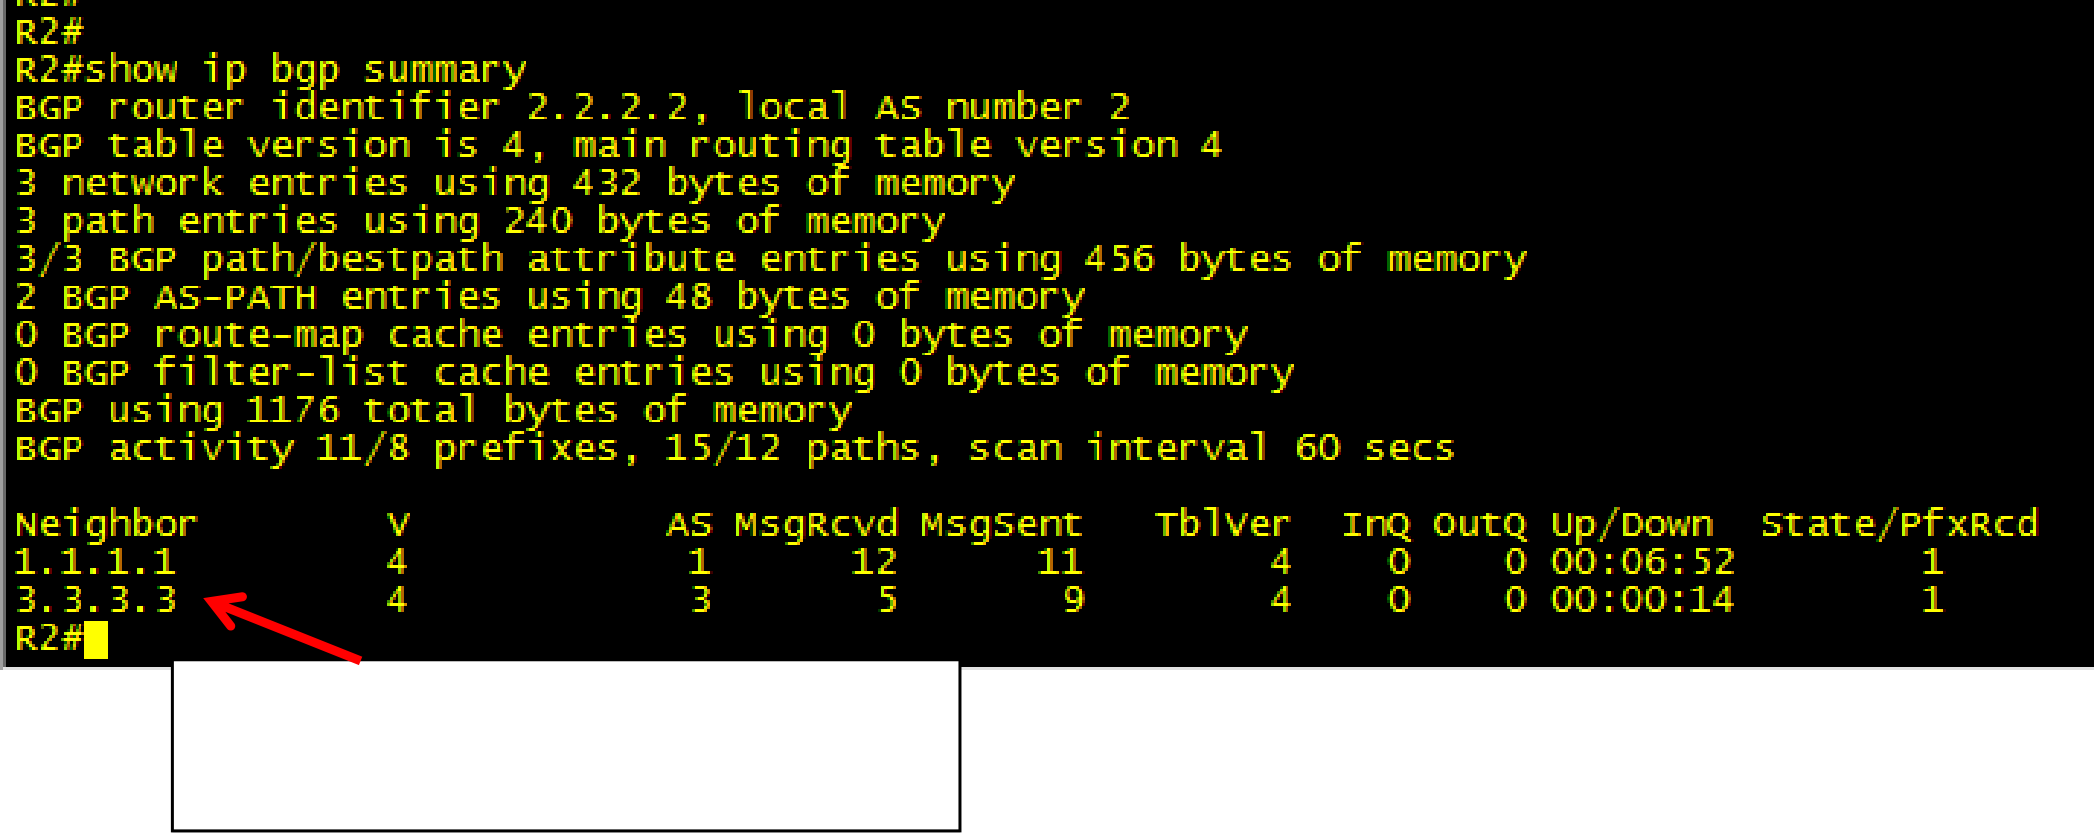
The neighbour’s router ID is 2.2.2.2 (R2)
The neighbour relationship will be maintained by the
exchange of short BGP messages called Keepalives every
60 seconds. A neighbour will be declared dead if no
Keepalives have been received for 180 seconds.(After
three consecutive keepalives have failed to arrive).
|
|---|
| • |
|---|
The local router is the TCP client and is using TCP port 12652. You will probably have a different outcome as this number is randomly chosen
• |
|
|---|
R1 (10.0.0.5) sent this packet to R2 (10.0.0.6)
Each message with a SYN code is part of the TCP
three way handshake
| • |
|---|
| • |
|---|
• • |
|---|
| • |
|---|

P a g e 7 | 22
| • • |
|
|---|
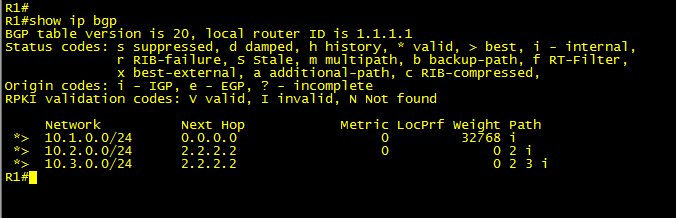
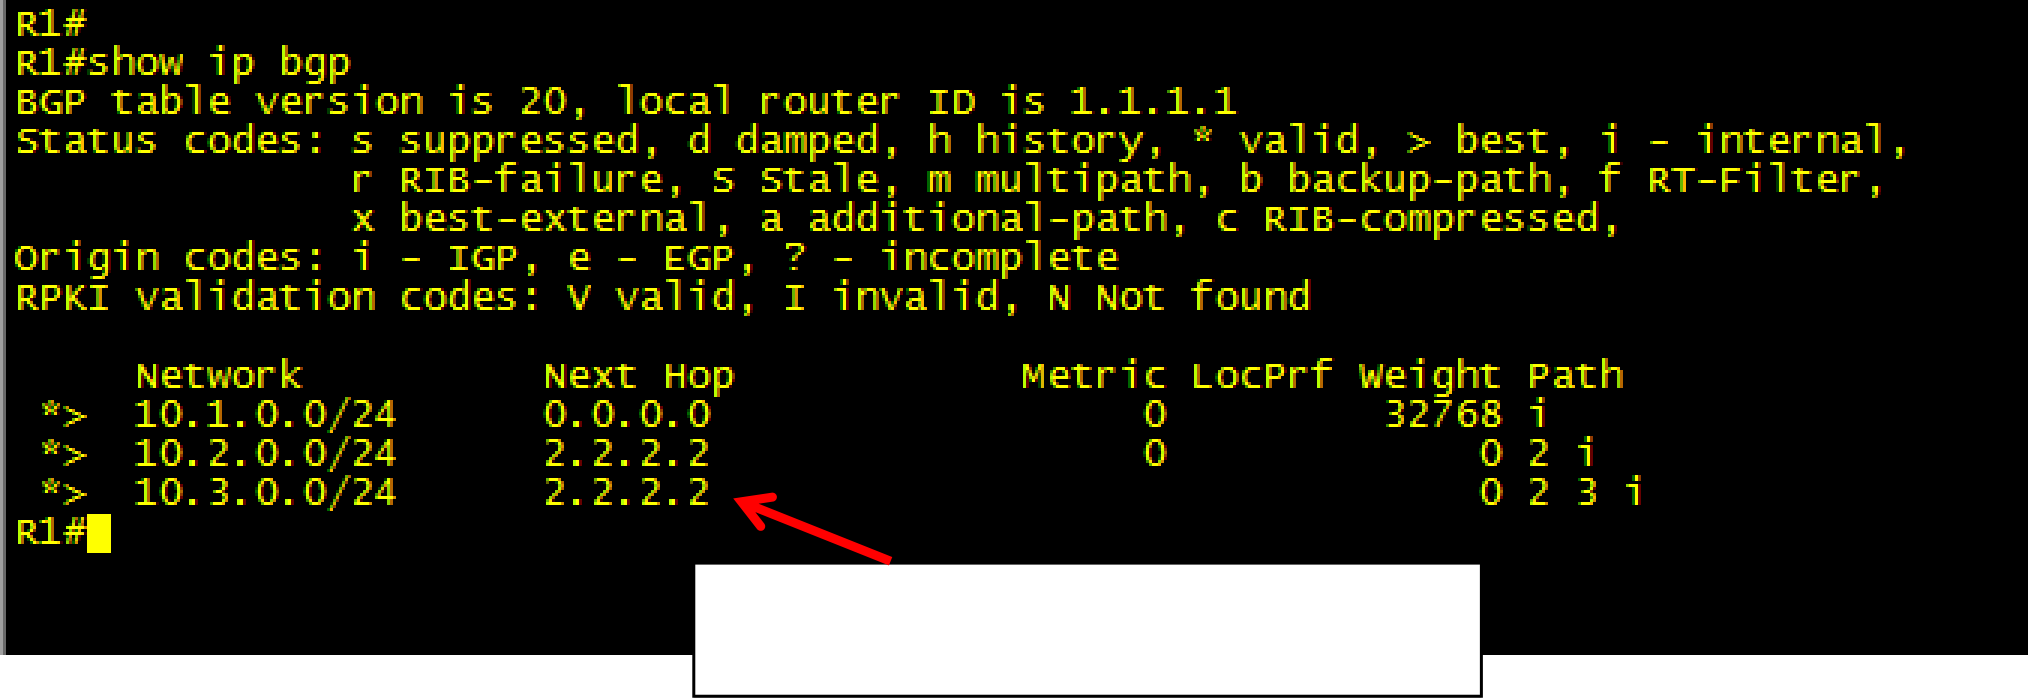
Enter the command show ip bgp on each router. You should see the following output.
A next hop of 0.0.0.0 indicates that this route was advertised by the local router (R1 in this case) via a network statement
P a g e 8 | 22
A next hop of 0.0.0.0 indicates that this route was advertised by the local router (R2 in this case) via a network statement
|
|---|
| • |
|---|
P a g e 9 | 22
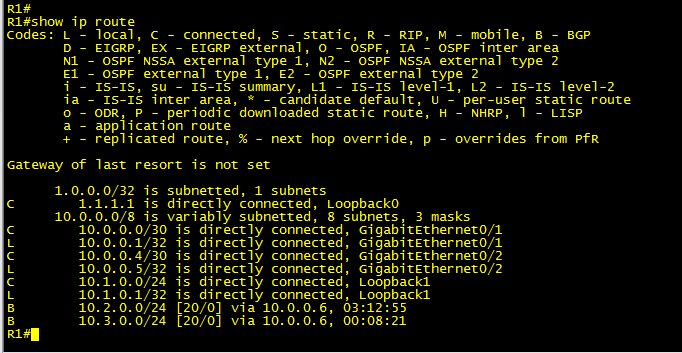
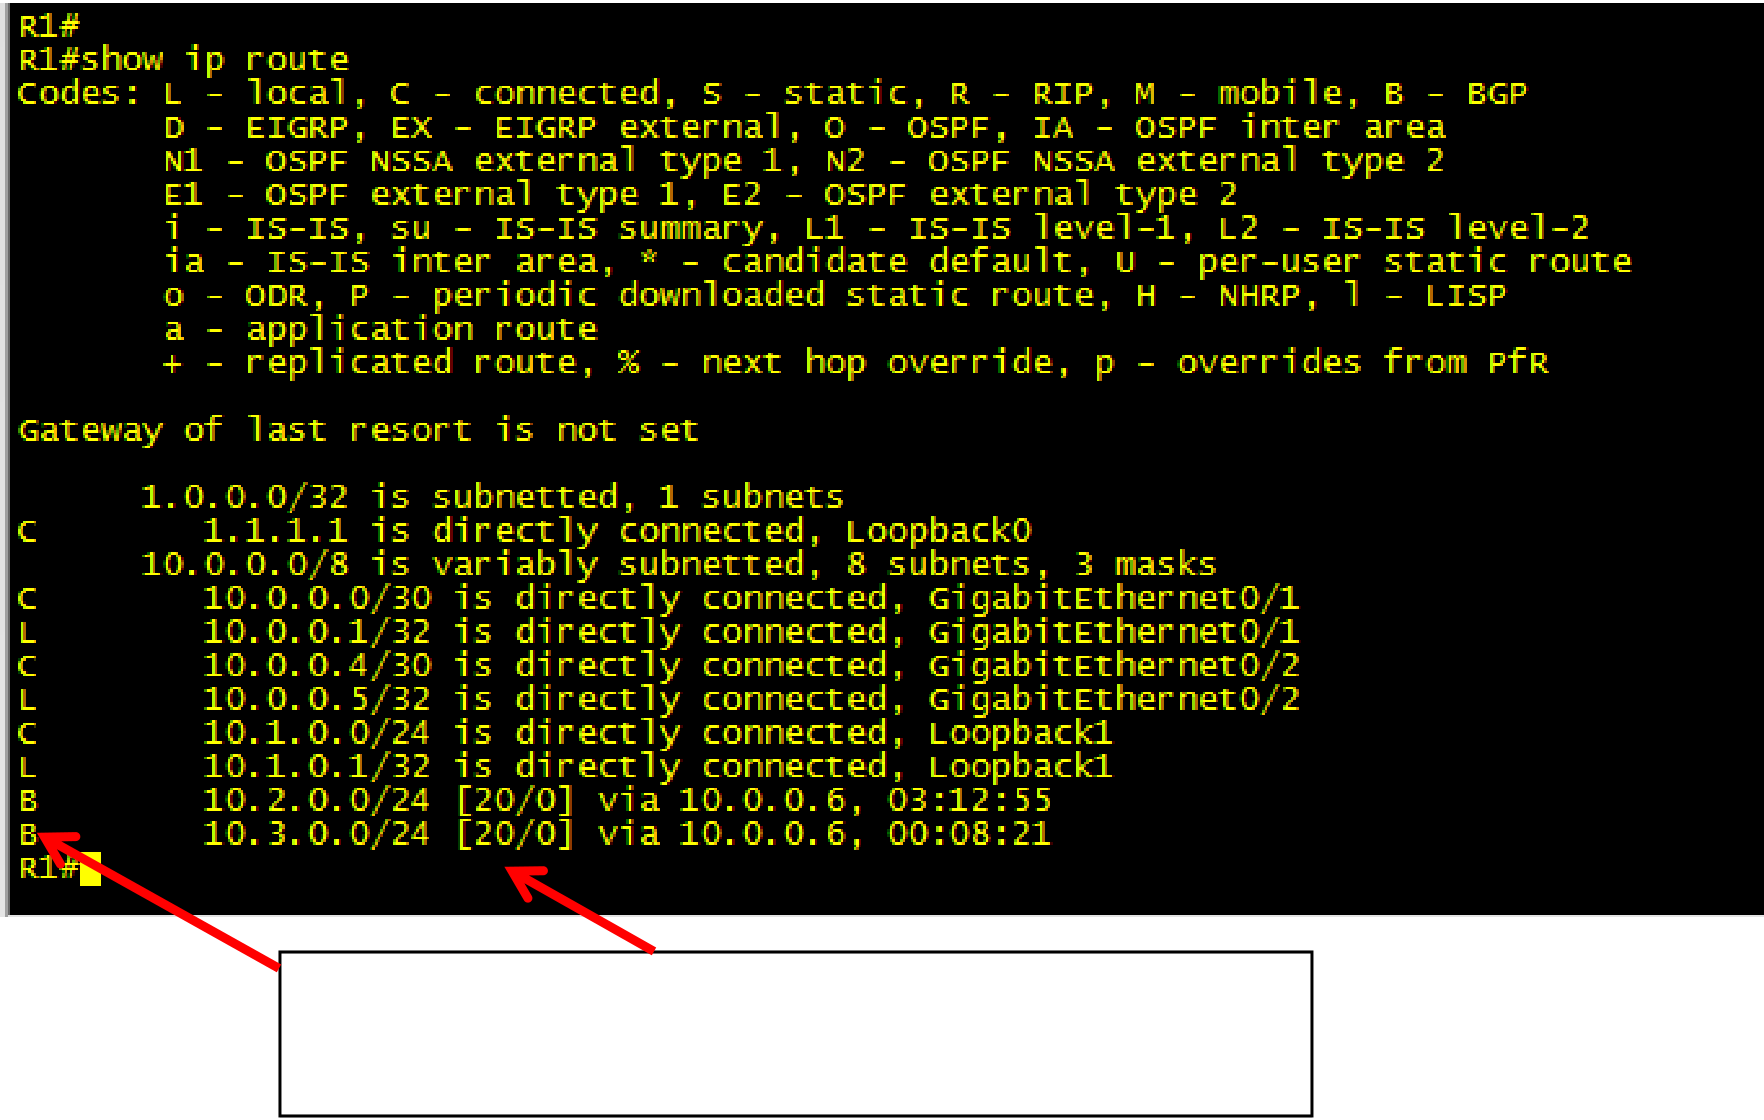
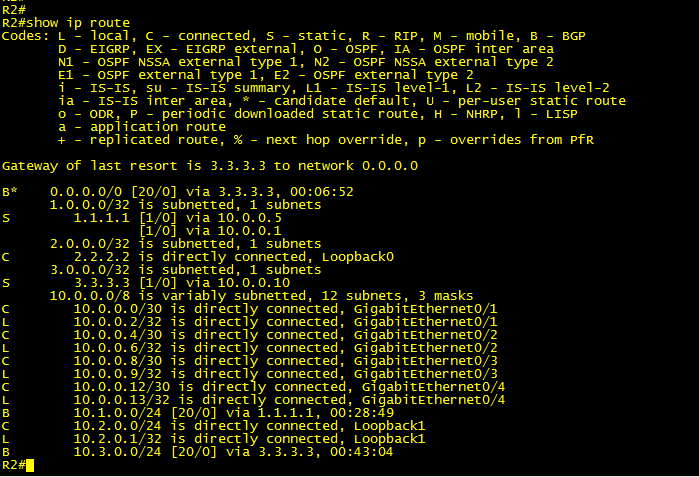
Show ip route on R1
An eBGP route is labelled with the letter B. It also has an
Admin distance of 20 which means it will be preferred over
IGPs but not static routes or directly connected routes
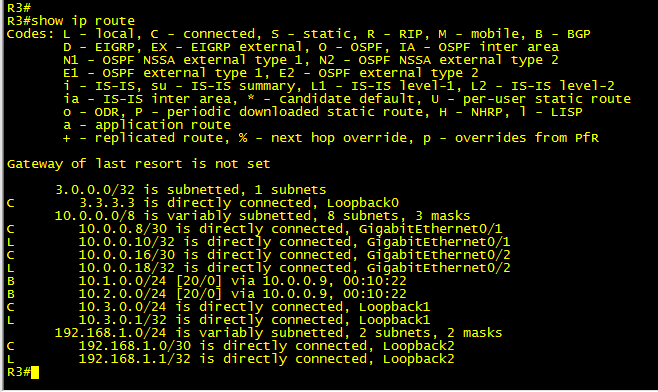
Show ip route on R3
| • |
|---|
| • |
|
|---|
This failed because the ping packets used 10.0.0.5 as the
source address. They were routed to R3 but R3 doesn’t know
where 10.0.0.5 is located and therefore couldn’t respond
| P a g e 11 | 22 |
|---|
| • |
|---|
This ping succeeded because R3 sent its pings with the source
address of lo1 (10.3.0.1). R1 received the pings and was able to
reply because it has a route to 10.3.0.0/24
| • |
|
|---|
Clear the BGP configuration on R1
Clear the BGP configuration on R2
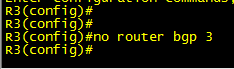
Clear the BGP configuration on R3

Required Static Route for R3
| • |
|---|

| • |
|
|---|
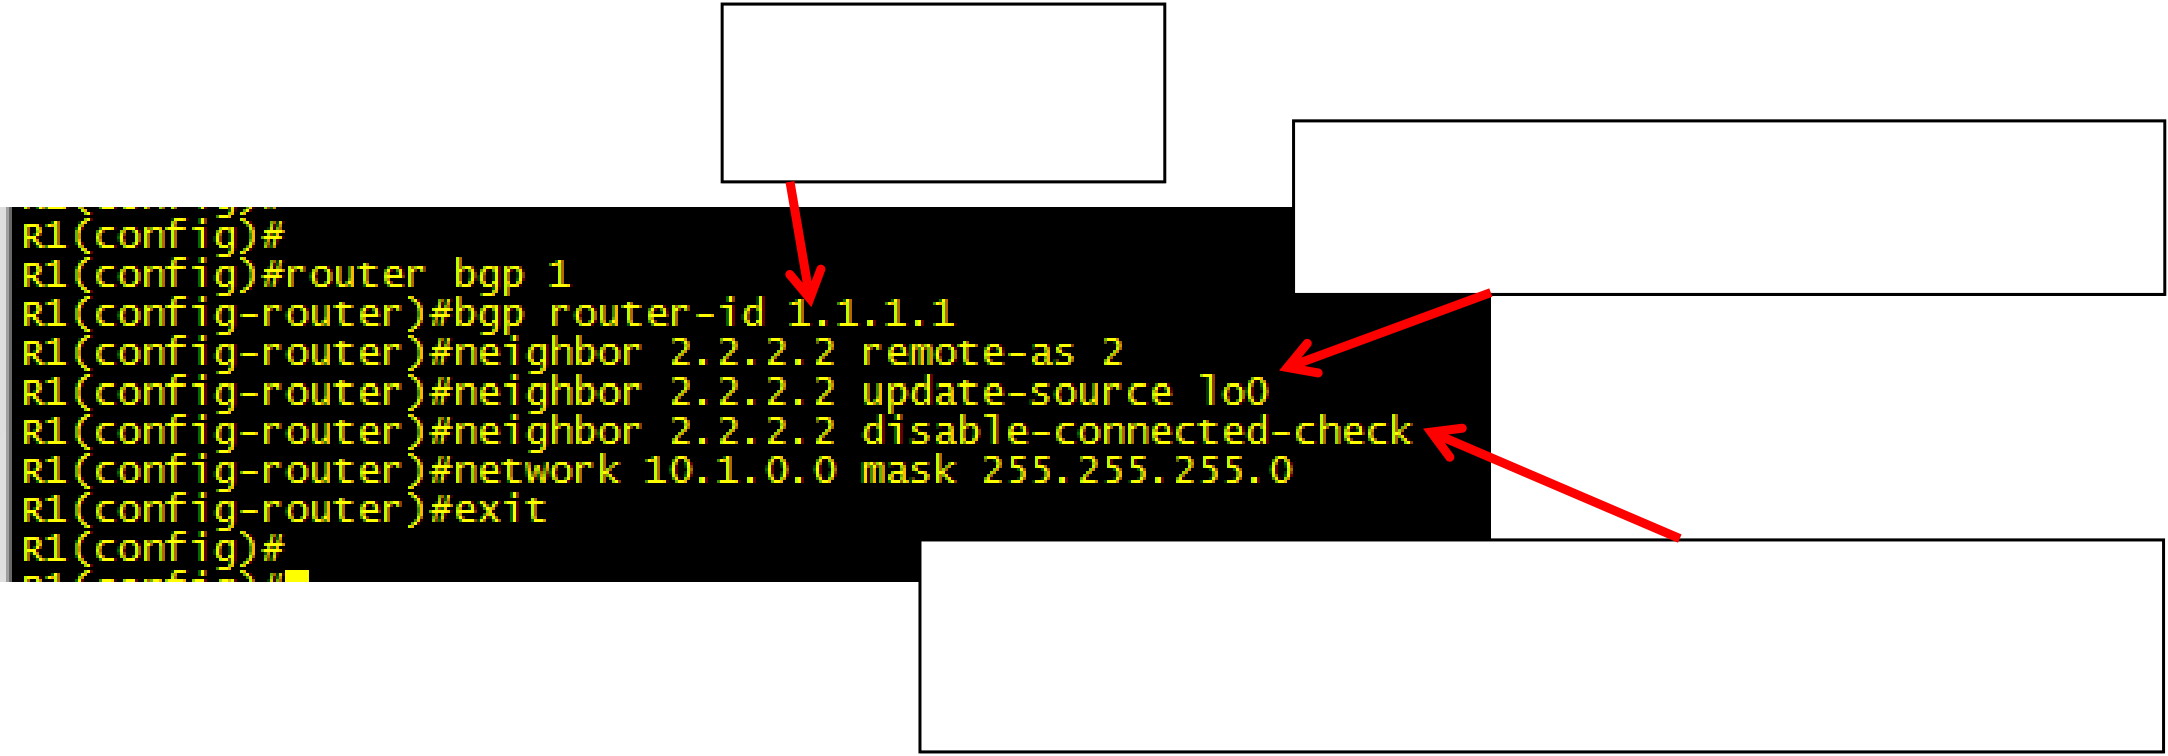
| New BGP configuration for R1 |
|
|
|
|---|---|---|---|
| • |
|
|
|
|---|---|---|---|
P a g e 14 | 22
| • |
|---|
R3 is now represented by its lo0 address
(3.3.3.3) rather than 10.0.0.10 which was its
| • |
|---|
address of lo0 of R2 (2.2.2.2)
P a g e 15 | 22
• • |
|---|

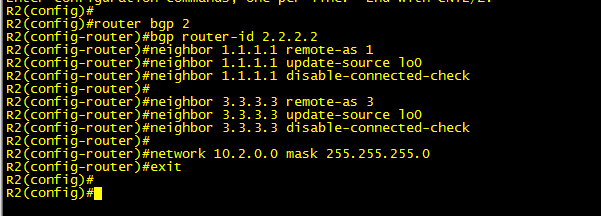
• Configuration for R3
| • |
|---|
BGP description text appears here if
configured. You can enter up to 80 charactersBasic Security
Password configuration for R1

| • |
|---|


| • |
|
|---|
| • |
|---|
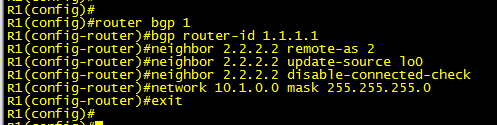
Configuration on R1

Please note that the commands above must be assigned to each side of a BGP neighbour relationship or the relationship will fail.
P a g e 18 | 22
| • |
|---|
BGP Default Routes
• Most companies that use BGP will still have to deploy a default route as they won’t have, or more
|
|
|
|---|---|---|
P a g e 19 | 22
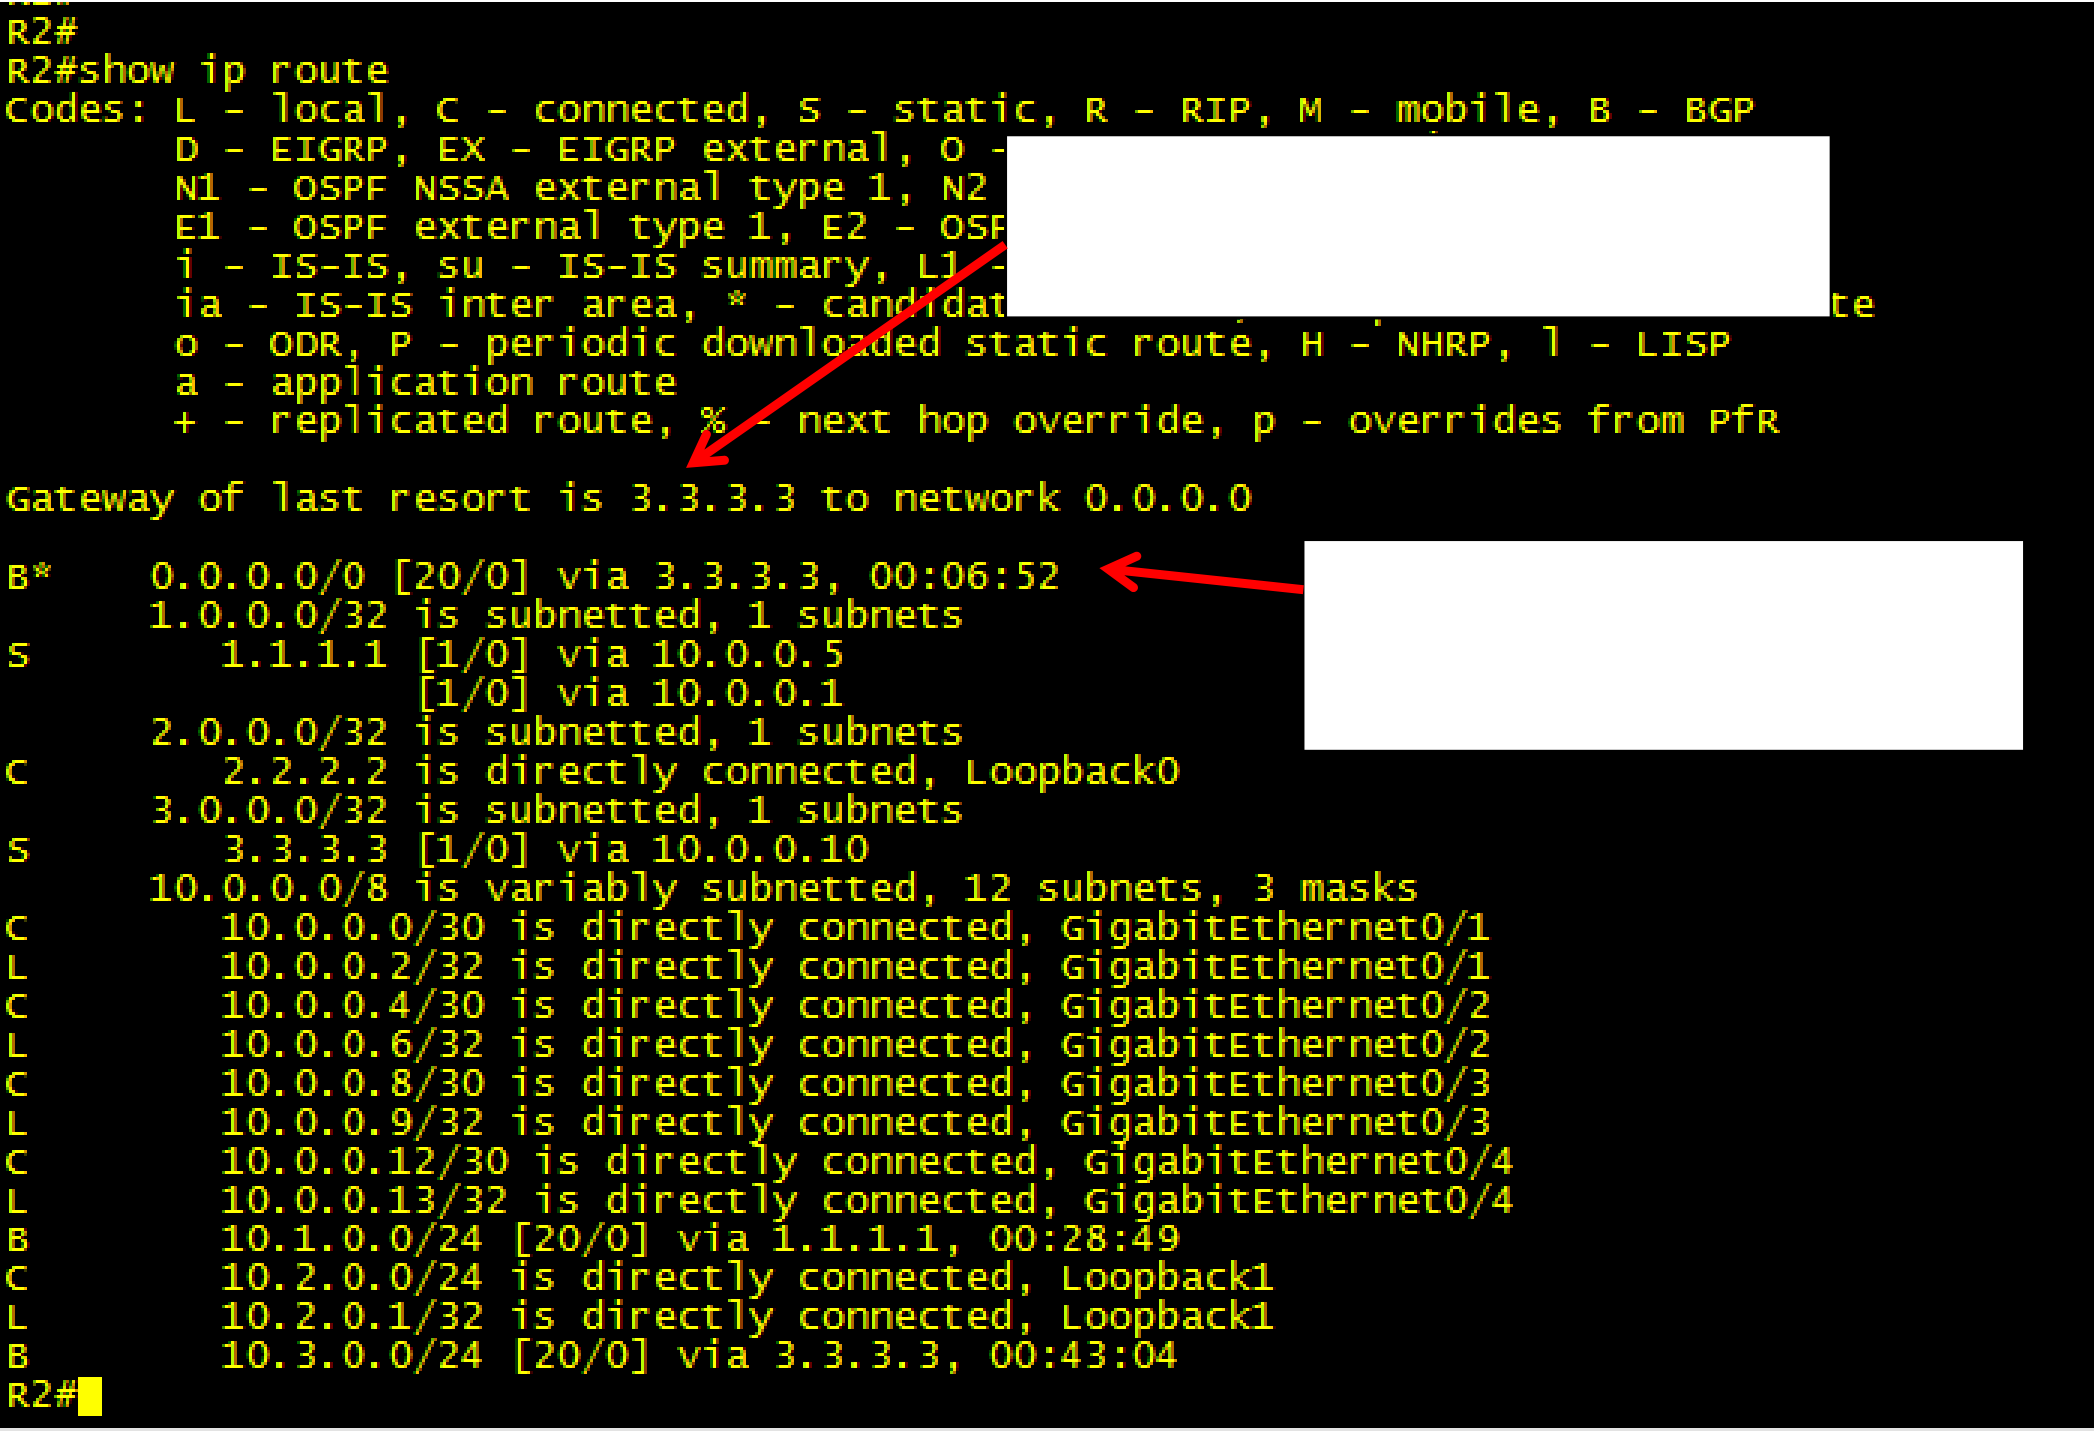
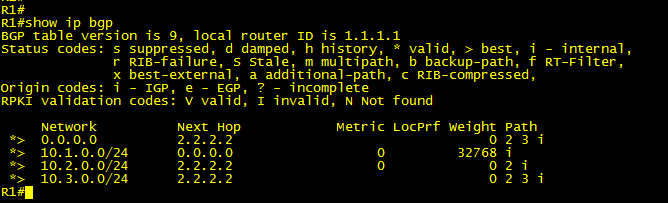
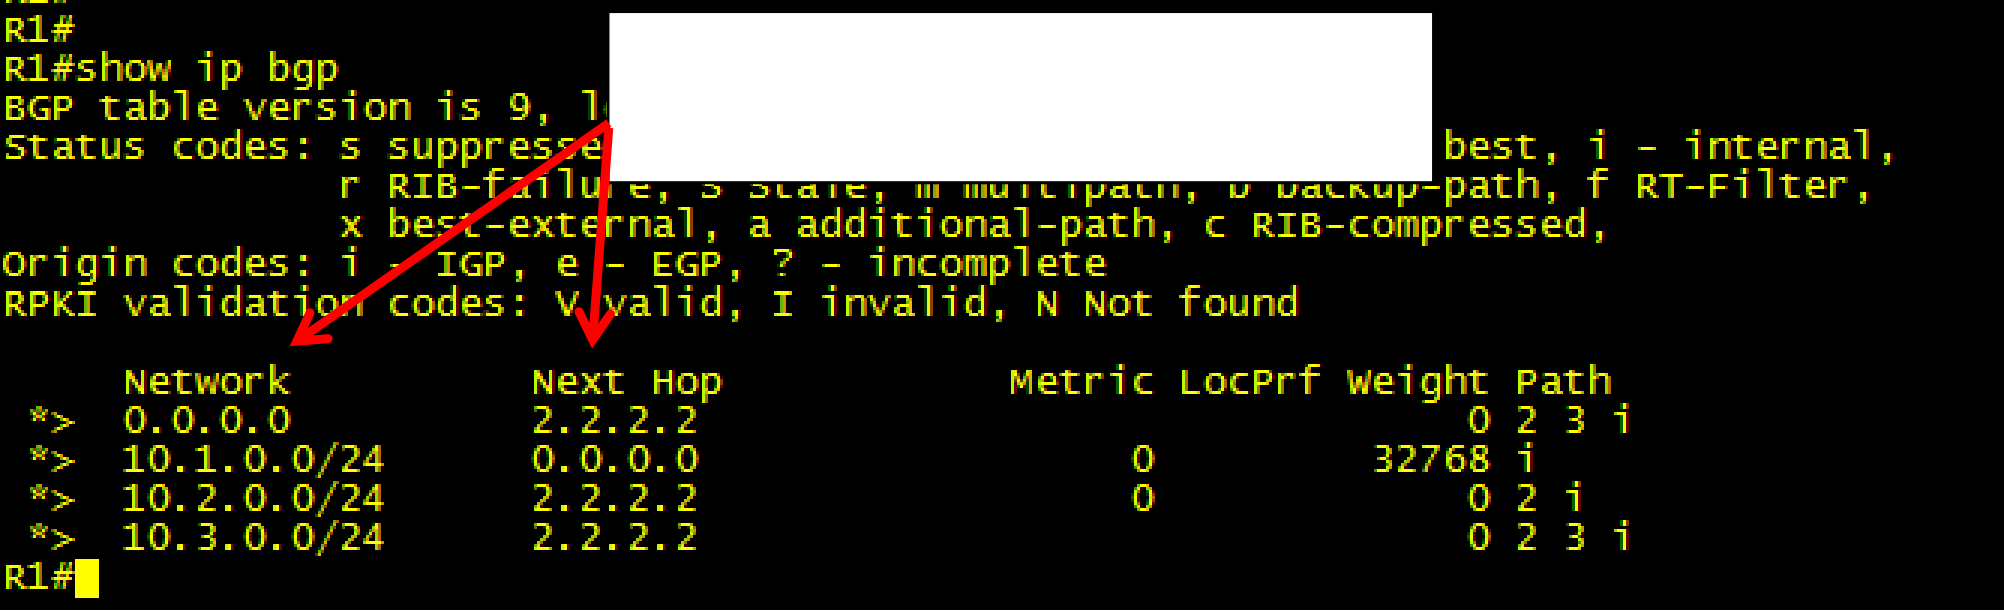
This is the BGP default route. Notice that
the letter B is superseded by a * which
indicates that this route is a candidate
default route
• If you check the BGP table on R1 you will find that R2 (2.2.2.2) has passed this default route on to R1.


