

Identify and adjust the crown wheel and pinion tooth backlash
Diagnose and repair light vehicle final drive assemblies
AURLTQ101
This unit describes the skills and knowledge required to diagnose and repair faults in the final drive assemblies of light vehicles. It involves preparing for the task, sourcing a diagnostic testing strategy, diagnosing the cause of the fault, carrying out the repair, performing post-repair testing, and completing workplace processes and documentation.
The unit applies to those working in the automotive service and repair industry. The final drive assemblies include those in light vehicles or light commercial vehicles.
NIL
Unit Sector
Table of Contents
1 Introduction ................................................................................................. 1
2.2.2 Spring loaded equipment ........................................................................................... 4
2.2.3 Safety procedures for working with hazardous fluids .............................................. 4
2.3.4 Work area safety ........................................................................................................ 10
2.4 Using lifting equipment....................................................................................... 10
3.1 Service information ............................................................................................ 14
3.2 Tools and equipment ......................................................................................... 17
4.1 Function of the final drive assembly ................................................................. 20
4.1.1 Power flow ................................................................................................................... 20
4.1.6 Spider gear walk ......................................................................................................... 21
4.2 Purpose ................................................................................................................ 21
4.3.1 Spur gears .................................................................................................................... 22
4.3.2 Helical gears ............................................................................................................... 22
4.3.7 Internal gears .............................................................................................................. 25
4.4 Gear ratio ............................................................................................................ 26
4.7.1 Driving straight ............................................................................................................ 27
4.7.2 Driving on turns ........................................................................................................... 27
4.8.3 Pinion gear .................................................................................................................. 29
4.8.4 Differential carrier ....................................................................................................... 30
5 Final drive assemblies and components ................................................ 33
5.1 Types of final drive assemblies ........................................................................... 33
5.2.1 Semi floating live axles ............................................................................................... 39
5.2.2 Three quarter floating live axles ................................................................................ 40
6 Diagnostic testing procedure ................................................................. 42
6.3.2 Noise diagnosis ........................................................................................................... 44
6.3.3 Vibration diagnosis ..................................................................................................... 45
7.1.1 Removal procedure ................................................................................................... 47
7.1.2 Disassembly procedure ............................................................................................. 47
7.2.2 Reassemble procedure ............................................................................................. 49
7.3 Service procedure of banjo differential assembly .......................................... 50
7.3.5 Disassemble differential carrier ................................................................................. 51
7.3.6 Inspection .................................................................................................................... 52
7.4.1 Removal procedure ................................................................................................... 54
7.4.2 Inspection .................................................................................................................... 54

Diagnose and repair light vehicle final drive assemblies
7.5.6 Identify and adjust the crown wheel and pinion tooth backlash ........................ 59
7.5.7 Transaxle installation procedure ............................................................................... 59
8.1.1 Visual inspection ......................................................................................................... 62
8.1.2 Road test ..................................................................................................................... 62
8.3.2 Diagnostics report ...................................................................................................... 65
8.3.3 Housekeeping procedures........................................................................................ 67

The final drive assembly helps drivetrain operations by providing final gear reduction. Final drive transfers the transmission power to the wheels and differential assembly allows and controls the tyre while turning at corners without binding.

Figure 1: Light vehicle final drive assembly
Ring and pinion gears are the gears of the final drive used for reducing speed. Different options of rear axle ratios are offered to meet the vehicle use demands. Low ratios increase the low-speed pulling power and high ratios enhances high-speed fuel economy.
Work health and safety (WHS) govern the safety, health, and well-being of people involved in work or employment. Irrespective of the nature of their work, employees must be able to carry out their responsibilities in a safe and secure working environment which is free from hazards.
WHS Regulations 2017 involves the safe operation of major hazard facilities, training for high-risk work, managing and removing asbestos and licenses for specific activities.
| For | further | information | on | WHS | regulations, | visit |
|---|
www.worksafe.vic.gov.au/automotive
Hazard identification is an important step in the safety management process. This helps in identifying, assessing every hazard related to work in order to control and find the solution at the earliest.
Hazard control is an active program of preventing the risk. While performing a task the technician should assess the possible hazards and risks in the task and should understand the severity of the hazard to take the necessary action.
Wear PPE (gloves) because oil contains chemicals and contaminants that are hazardous for skin.
Wear hard hat while working under the vehicle.
Use only recommended tools by the manufacturer to avoid physical injuries.
When working on drive line be aware of rotating shafts, especially when operating the vehicle on a hoist.
Avoid contact of eyes or skin with hot gear oil or cleaning fluid. Seek medical
To prevent yourself from serious burns, avoid contact with hot metal parts such as
exhaust system components.
Make sure that the clamping devices are evenly secured.
Avoid leaning over a compressed spring.

Using, handling, generating and storing of hazardous fluids at the workshop is done
in accordance with the WHS Regulations.
Identify the risk of physical and chemical reaction and ensure stability of the
fluids.
substances.
4
2.3 Safety
Safety includes management of hazards and risks related to vehicle repair. This includes the risks to workers, helpers and vehicle components.
 |
|---|
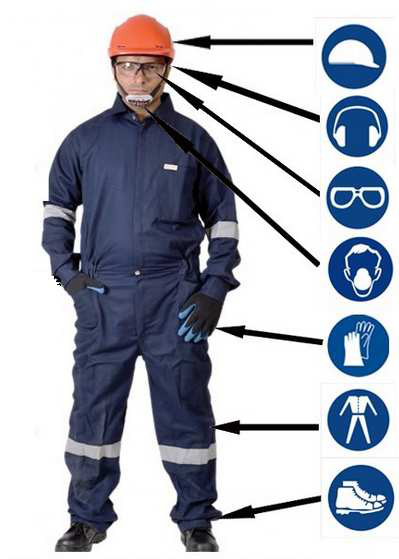
2.3.1Personal safety
Respiratory protective equipment – It prevents from inhaling hazardous chemicals, asbestos, fumes, brake dust, etc.
Examples – Air-purifying respirators, supplied air respirators
Skin protection – Hazards like absorption of harmful substances, chemical or thermal burns, electrical dangers, bruises, cuts, and fractures can be prevented by wearing skin protection PPE.

Examples – Safety gloves, heat resistance gloves, metal or leather mesh gloves.
6
Diagnose and repair light vehicle final drive assemblies
Hand tool safety

may cause injuries while working.
Inspect the tools for the cracks or damages and never use the tool if found
Never use a wrench or pliers as a hammer.
Always be aware of striking an object with the full-face hammerhead.
7
Diagnose and repair light vehicle final drive assemblies
Always wear safety glasses when using power tools. Never try to use a tool beyond
its stated capacity.
equipment’s.
Ensure that the electrical tools are properly grounded before operating.
Check the wiring for insulation cracks, as well as bare wires, before using it.
Avoid contact with electrical tools using wet hands and water surrounding as it
Never leave a running power tool unattended.
8
Make sure there are no people or parts around the machine before starting it.
Keep hands and clothing away from the moving parts.
Before using a pneumatic tool, check all the hose connections for leaks. Also, check for airline damage.
When using an air nozzle, always wear safety glasses or a face shield as the dirt particles and metal pieces blown by high-pressure air can penetrate the skin or get into eyes.
Never spin bearings with compressed air. If the bearing is damaged, one of the steel balls or rollers might fly out and cause serious injury.
Never hold the vehicle on the jack for a longer time. Always use safety stands to support the jack for a longer time.
Apply the parking brake and shift the gear to Parking, before the vehicle is lifted on the Hoist.
To clean up oil, use commercial oil absorbent.
Keep the water off the floor as water is slippery on smooth floors, and electricity flows well through water.
2.4 Using lifting equipment

Relevant service methods and appropriate repair procedures are important for safe,
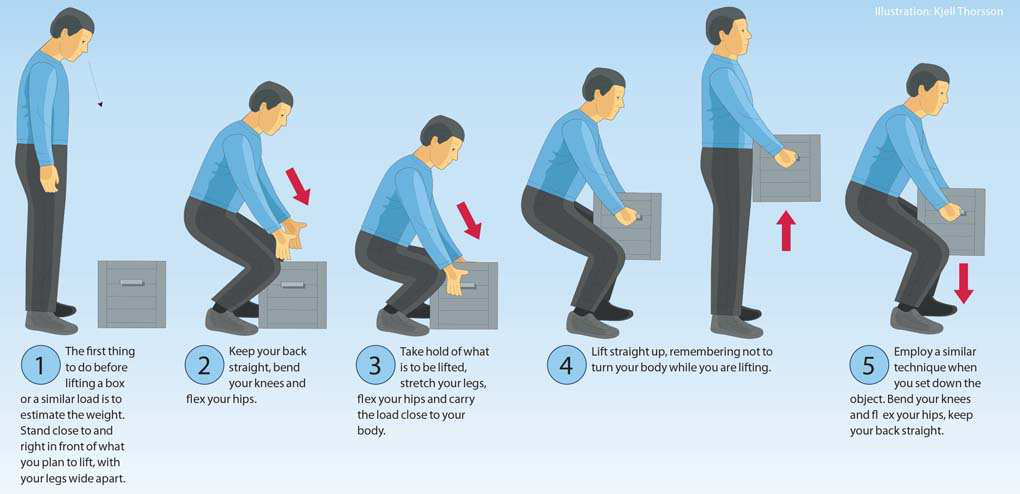
2.4.1Lifting heavy objects
Lifting heavy objects require correct lifting techniques.Precautions for lifting heavy objects:
Do not twist the body or jerk the object.

 |
|---|
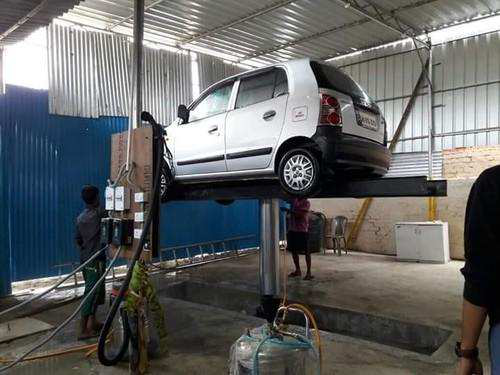
Figure 8: Lifting vehicles with hoists Precautions while using hoist:
Check for sufficient ceiling clearance.
Ensure that there are no tools and equipment from the area below the vehicle before lowering the vehicle.
Locate the vehicle jacking points.
12
Check out for the bulging jack handle.
2.5 Environmental requirements
Trapping fluid: Fluids should be collected by using proper oil collecting equipment like trays.
Storing fluids: Fluids should be stored in good quality bulk tanks or 200 litre drums, in an enclosed area, preferably under a roof, or on spill containment pallets or other self-bunded storage units. They must never be tipped down storm water drains or sewers, tipped on to soil or bunt (only EPA licensed incinerators can be used to burn PIW (prescribed industrial wastes)
3. Preparation for inspection and service
The vehicle preparation for inspection and service will make the job easier and quicker.
Diagnostic process and methods
Periodic maintenance chart
3.1 Service information

System diagnostic procedures
Repair instructions


