

3. tracing dns with wireshark
Wireshark Lab: DNS v8.0 |
 |
As described in Section 2.4 of the text1, the Domain Name System (DNS) translates hostnames to IP addresses, fulfilling a critical role in the Internet infrastructure. In this lab, we’ll take a closer look at the client side of DNS. Recall that the client’s role in the DNS is relatively simple – a client sends a query to its local DNS server, and receives a response back. As shown in Figures 2.19 and 2.20 in the textbook, much can go on “under the covers,” invisible to the DNS clients, as the hierarchical DNS servers communicate with each other to either recursively or iteratively resolve the client’s DNS query. From the DNS client’s standpoint, however, the protocol is quite simple – a query is formulated to the local DNS server and a response is received from that server.
Before beginning this lab, you’ll probably want to review DNS by reading Section 2.4 of the text. In particular, you may want to review the material on local DNS servers, DNS caching, DNS records and messages, and the TYPE field in the DNS record.
The above screenshot shows the results of three independent nslookup commands (displayed in the Windows Command Prompt). In this example, the client host is located on the campus of Polytechnic University in Brooklyn, where the default local DNS server is dns-prime.poly.edu. When running nslookup, if no DNS server is specified, then nslookup sends the query to the default DNS server, which in this case is dns-prime.poly.edu. Consider the first command:
nslookup www.mit.edu
Now finally consider the third command:
nslookup www.aiit.or.kr bitsy.mit.edu
Now that we have provided an overview of nslookup, it is time for you to test drive it yourself. Do the following (and write down the results):
Run nslookup to obtain the IP address of a Web server in Asia. What is the IP address of that server?
ipconfig \all
into the Command Prompt, as shown in the following screenshot.
ipconfig /flushdns
Flushing the DNS cache clears all entries and reloads the entries from the hosts file.
3. Tracing DNS with Wireshark
Start packet capture in Wireshark.
With your browser, visit the Web page: http://www.ietf.org
Locate the DNS query and response messages. Are then sent over UDP or TCP?
What is the destination port for the DNS query message? What is the source port of DNS response message?
This web page contains images. Before retrieving each image, does your host issue new DNS queries?
You should get a trace that looks something like the following: 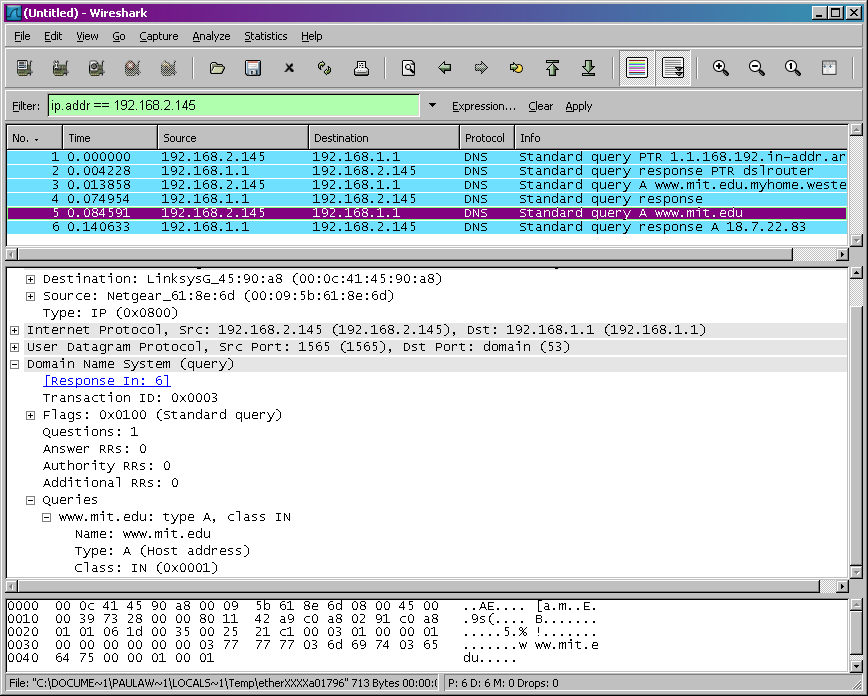
We see from the above screenshot that nslookup actually sent three DNS queries and received three DNS responses. For the purpose of this assignment, in answering the following questions, ignore the first two sets of queries/responses, as they are specific to nslookup and are not normally generated by standard Internet applications. You should instead focus on the last query and response messages.
Provide a screenshot.
Now repeat the previous experiment, but instead issue the command:
Examine the DNS query message. What “Type” of DNS query is it? Does the query message contain any “answers”?
Examine the DNS response message. What MIT nameservers does the response message provide? Does this response message also provide the IP addresses of the MIT namesers?
Answer the following questions2:
To what IP address is the DNS query message sent? Is this the IP address of your default local DNS server? If not, what does the IP address correspond to?


