Create React App
Create React App
The create-react-app tool is an officially supported way to create React applications.
Node.js is required to use create-react-app.
Open your terminal in the directory you would like to create your application.
Run this command to create a React application named my-react-app:
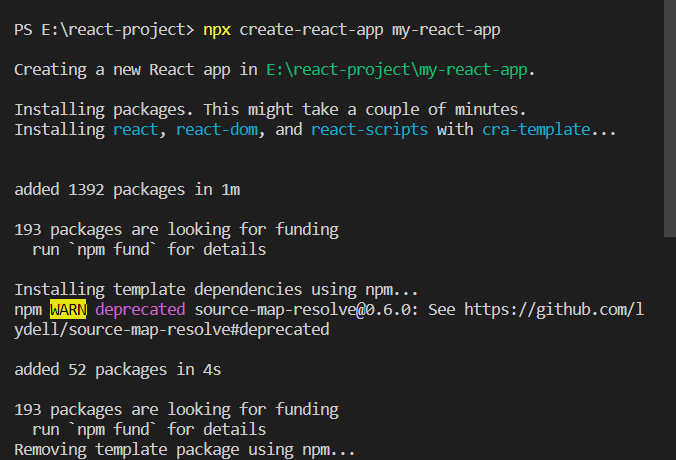
Run the React Application
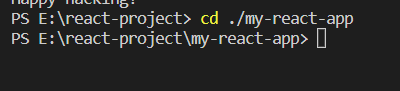
Run this command to move to the my-react-app directory:
Run this command to execute the React application my-react-app :
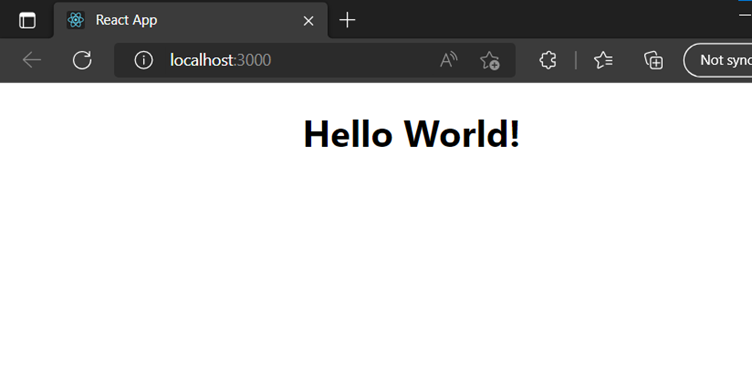
Npm start
A new browser window will pop up with your newly created React App! If not, open your browser and type localhost:3000 in the address bar.
The result:

React Introduction
What is React?
React, sometimes referred to as a frontend JavaScript framework, is a JavaScript library created by Facebook.
React is a tool for building UI components.
How does React Work?
React creates a VIRTUAL DOM in memory.
Instead of manipulating the browser's DOM directly, React creates a virtual DOM in memory, where it does all the necessary manipulating, before making the changes in the browser DOM.
React only changes what needs to be changed!
React finds out what changes have been made, and changes only what needs to be changed.
You will learn the various aspects of how React does this in the rest of this tutorial.
React.JS History
Current version of React.JS is V18.0.0 (April 2022).
Initial Release to the Public (V0.3.0) was in July 2013.
React.JS was first used in 2011 for Facebook's Newsfeed feature.
Facebook Software Engineer, Jordan Walke, created it.
Current version of create-react-app is v5.0.1 (April 2022).
create-react-app includes built tools such as webpack, Babel, and ESLint.
React Getting Started
To use React in production, you need npm which is included with Node.js.
To get an overview of what React is, you can write React code directly in HTML.
But in order to use React in production, you need npm and Node.js installed.
React Directly in HTML
The quickest way start learning React is to write React directly in your HTML files.
Start by including three scripts, the first two let us write React code in our JavaScripts, and the third, Babel, allows us to write JSX syntax and ES6 in older browsers.
Example
{`
Include three CDN's in your HTML file:
<!DOCTYPE html>
<html>
<head>
<script src="https://unpkg.com/react@18/umd/react.development.js" crossorigin></script>
<script src="https://unpkg.com/react-dom@18/umd/react-dom.development.js" crossorigin></script>
<script src="https://unpkg.com/@babel/standalone/babel.min.js"></script>
</head>
<body>
<div id="mydiv"></div>
<script type="text/babel">
function Hello() {
return <h1>Hello World!</h1>;
}
ReactDOM.render(<Hello />, document.getElementById('mydiv'))
</script>
</body>
</html>
`}
This way of using React can be OK for testing purposes, but for production need to set up a React environment.
Setting up a React Environment
If you have npx and Node.js installed, create a React application by using create-react-app.
Modify the React Application
So far so good, but how do I change the content?
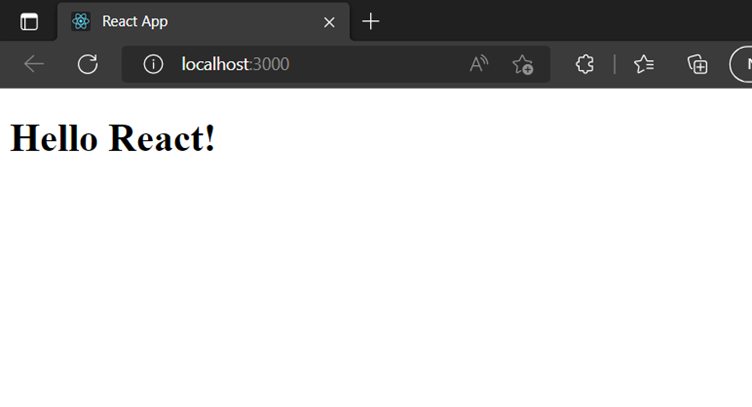
Look in the my-react-app directory, and you will find a src folder. Inside the src folder there is a file called App.js, open it and it will look like this:
/myReactApp/src/App.js:
Replace all the content inside the <div className="App"> with a <h1> element.
See the changes in the browser when you click Save.
{`
import logo from './logo.svg';
import './App.css';
function App() {
return (
<div className="App">
<h1>Hello World!</h1>
</div>
);
}
export default App;
`}
The result:
start by stripping down the src folder to only contain one file: index.js. You should also remove any unnecessary lines of code inside the index.js file to make them look like the example in the "Show React" tool below:
{`
import logo from './logo.svg';
import './App.css';
function App() {
return (
<div className="App">
<h1>Hello World!</h1>
</div>
);
}
export default App;
`}
result:
React ES6
What is ES6?
ES6 stands for ECMAScript 6.
ECMAScript was created to standardize JavaScript, and ES6 is the 6th version of ECMAScript, it was published in 2015, and is also known as ECMAScript 2015.
React ES6 Classes
Classes
ES6 introduced classes.
A class is a type of function, but instead of using the keyword function to initiate it, we use the keyword class , and the properties are assigned inside a constructor() method.
A simple class constructor:
{`
class Car {
constructor(name) {
this.brand = name;
}
}
Now you can create objects using the Car class:
Example
Create an object called "mycar" based on the Car class:
class Car {
constructor(name) {
this.brand = name;
}
}
const mycar = new Car("Ford");
Method in Classes
You can add your own methods in a class:
Example
Create a method named "present":
class Car {
constructor(name) {
this.brand = name;
}
present() {
return 'I have a ' + this.brand;
}
}
const mycar = new Car("Ford");
mycar.present();
`}
result: I have a Ford
Class Inheritance
To create a class inheritance, use the extends keyword.
A class created with a class inheritance inherits all the methods from another class:
Example
{`
Create a class named "Model" which will inherit the methods from the "Car" class:
class Car {
constructor(name) {
this.brand = name;
}
present() {
return 'I have a ' + this.brand;
}
}
class Model extends Car {
constructor(name, mod) {
super(name);
this.model = mod;
}
show() {
return this.present() + ', it is a ' + this.model
}
}
const mycar = new Model("Ford", "Mustang");
mycar.show();
`}
result: I have a Ford, it is a Mustang
The super() method refers to the parent class.
By calling the super() method in the constructor method, we call the parent's constructor method and gets access to the parent's properties and methods.
React ES6 Arrow Functions
{`
Arrow Functions
Arrow functions allow us to write shorter function syntax:
Before:
hello = function() {
return "Hello World!";
}
With Arrow Function:
hello = () => {
return "Hello World!";
}
It gets shorter! If the function has only one statement, and the statement returns a value, you can remove the brackets and the return keyword:
Arrow Functions Return Value by Default
hello = () => "Hello World!";
Arrow Function With Parameters:
hello = (val) => "Hello" + val;
In fact, if you have only one parameter, you can skip the parentheses as well:
Arrow Function Without Parentheses:
hello = val => "Hello " + val
`}
What About this?
The handling of this is also different in arrow functions compared to regular functions.
In short, with arrow functions there is no binding of this.
In regular functions the this keyword represented the object that called the function, which could be the window, the document, a button or whatever.
With arrow functions, the this keyword always represents the object that defined the arrow function.
Let us take a look at two examples to understand the difference.
Both examples call a method twice, first when the page loads, and once again when the user clicks a button.
The first example uses a regular function, and the second example uses an arrow function.
The result shows that the first example returns two different objects (window and button), and the second example returns the Header object twice.
Example
{`
With a regular function, this represents the object that called the function:
class Header {
constructor() {
this.color = "Red";
}
//Regular function:
changeColor = function() {
document.getElementById("demo").innerHTML += this;
}
}
const myheader = new Header();
//The window object calls the function:
window.addEventListener("load", myheader.changeColor);
//A button object calls the function:
document.getElementById("btn").addEventListener("click", myheader.changeColor);
Example
With an arrow function, this represents the Header object no matter who called the function:
class Header {
constructor() {
this.color = "Red";
}
//Arrow function:
changeColor = () => {
document.getElementById("demo").innerHTML += this;
}
}
const myheader = new Header();
//The window object calls the function:
window.addEventListener("load", myheader.changeColor);
//A button object calls the function:
document.getElementById("btn").addEventListener("click", myheader.changeColor);
`}
React ES6 Variables
Variables
Before ES6 there was only one way of defining your variables: with the var keyword. If you did not define them, they would be assigned to the global object. Unless you were in strict mode, then you would get an error if your variables were undefined.
Now, with ES6, there are three ways of defining your variables: var, let, and const.
Var
var x =5.6;
use var outside of a function, it belongs to the global scope.
Use var inside of a function, it belongs to that function.
use var inside of a block, i.e. a for loop, the variable is still available outside of that block.
var has a function scope, not a block scope.
Let
let x =5.6;
let is the block scoped version of var, and is limited to the block (or expression) where it is defined.
If you use let inside of a block, i.e. a for loop, the variable is only available inside of that loop.
let has a block scope.
Const
Const x = 5.6;
const is a variable that once it has been created, its value can never change.
const has a block scope.
The keyword const is a bit misleading.
It does not define a constant value. It defines a constant reference to a value.
Because of this you can NOT:
- Reassign a constant value
- Reassign a constant array
- Reassign a constant object
But you CAN:
- Change the elements of constant array
- Change the properties of constant object
React ES6 Array Methods
Array Methods
There are many JavaScript array methods.
One of the most useful in React is the .map() array method.
The .map() method allows you to run a function on each item in the array, returning a new array as the result.
In React, map() can be used to generate lists.
Example
{`
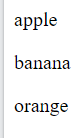
Generate a list of items from an array:
const myArray = ['apple', 'banana', 'orange'];
const myList = myArray.map((item) => <p>{item}</p>)
`}
Result:
React ES6 Destructuring
Destructuring
Destructuring makes it easy to extract only what is needed.
Destructing Arrays
Here is the old way of assigning array items to a variable:
const vehicles = ['mustang', 'f-150', 'expedition'];
// old way
const car = vehicles[0];
const truck = vehicles[1];
const suv = vehicles[2];
Here is the new way of assigning array items to a variable:
With destructuring:
When destructuring arrays, the order that variables are declared is important.
If we only want the car and suv we can simply leave out the truck but keep the comma:
{`
const vehicles = ['mustang', 'f-150', 'expedition'];
const [car,, suv] = vehicles;
Destructuring comes in handy when a function returns an array:
Example
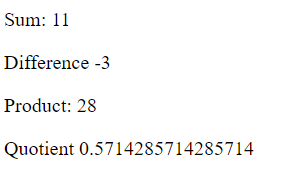
function calculate(a, b) {
const add = a + b;
const subtract = a - b;
const multiply = a * b;
const divide = a / b;
return [add, subtract, multiply, divide];
}
const [add, subtract, multiply, divide] = calculate(4, 7);
`}
result :
Destructuring Objects
Here is the old way of using an object inside a function:
{`
Before:
const vehicleOne = {
brand: 'Ford',
model: 'Mustang',
type: 'car',
year: 2021,
color: 'red'
}
myVehicle(vehicleOne);
// old way
function myVehicle(vehicle) {
const message = 'My ' + vehicle.type + ' is a ' + vehicle.color + ' ' + vehicle.brand + ' ' + vehicle.model + '.';
}
Here is the new way of using an object inside a function:
const vehicleOne = {
brand: 'Ford',
model: 'Mustang',
type: 'car',
year: 2021,
color: 'red'
}
myVehicle(vehicleOne);
function myVehicle({type, color, brand, model}) {
const message = 'My ' + type + ' is a ' + color + ' ' + brand + ' ' + model + '.';
}
`}
Notice that the object properties do not have to be declared in a specific order.
destructure deeply nested objects by referencing the nested object then using a colon and curly braces to again destructure the items needed from the nested object:
Example
{`
const vehicleOne = {
brand: 'Ford',
model: 'Mustang',
type: 'car',
year: 2021,
color: 'red',
registration: {
city: 'Houston',
state: 'Texas',
country: 'USA'
}
}
myVehicle(vehicleOne)
function myVehicle({ model, registration: { state } }) {
const message = 'My ' + model + ' is registered in ' + state + '.';
}
`}
Result:
![]()
React ES6 Spread Operator
Spread Operator
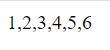
The JavaScript spread operator (...) allows us to quickly copy all or part of an existing array or object into another array or object.
Example
const numbersOne = [1, 2, 3];
const numbersTwo = [4, 5, 6];
const numbersCombined = [...numbersOne, ...numbersTwo];
result:
The spread operator is often used in combination with destructuring.
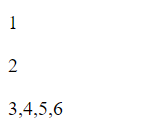
Example
Assign the first and second items from numbers to variables and put the rest in an array:
const numbers = [1, 2, 3, 4, 5, 6];
const [one, two, ...rest] = numbers;
result:
We can use the spread operator with objects too:
Example
{`
Combine these two objects:
const myVehicle = {
brand: 'Ford',
model: 'Mustang',
color: 'red'
}
const updateMyVehicle = {
type: 'car',
year: 2021,
color: 'yellow'
}
const myUpdatedVehicle = {...myVehicle, ...updateMyVehicle}
`}
result:

React ES6 Modules
Modules
JavaScript modules allow you to break up your code into separate files.
This makes it easier to maintain the code-base.
ES Modules rely on the import and export statements.
Named Exports
You can create named exports two ways. In-line individually, or all at once at the bottom.
{`
In-line individually:
person.js
export const name = "Jesse"
export const age = 40
All at once at the bottom:
person.js
const name = "Jesse"
const age = 40
export { name, age }
`}
Default Exports
Let us create another file, named message.js, and use it for demonstrating default export.
You can only have one default export in a file
Example
{`
message.js
const message = () => {
const name = "Jesse";
const age = 40;
return name + ' is ' + age + 'years old.';
};
`}
export default message;
{`
Import from default exports
Import a default export from the file message.js:
import message from "./message.js";
React ES6 Ternary Operator
Ternary Operator
The ternary operator is a simplified conditional operator like if / else.
Syntax:  condition ? <expression if true> : <expression if false>
Here is an example using if / else:
Before:
if (authenticated) {
renderApp();
} else {
renderLogin();
}
`}
Here is the same example using a ternary operator:
With Ternary
authenticated ? renderApp() : renderLogin();
React Render HTML
React's goal is in many ways to render HTML in a web page.
React renders HTML to the web page by using a function called ReactDOM.render().
The Render Function
The ReactDOM.render() function takes two arguments, HTML code and an HTML element.
The purpose of the function is to display the specified HTML code inside the specified HTML element.
But render where?
There is another folder in the root directory of your React project, named "public". In this folder, there is an index.html file.
You'll notice a single <div> in the body of this file. This is where our React application will be rendered.
import React from 'react';
import ReactDOM from 'react-dom/client';
ReactDOM.render(<p>Hello</p>, document.getElementById('root'));
The HTML Code
The HTML code in this tutorial uses JSX which allows you to write HTML tags inside the JavaScript code:
Example
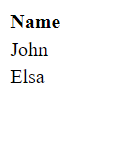
{`
Create a variable that contains HTML code and display it in the "root" node:
const myelement = (
<table>
<tr>
<th>Name</th>
</tr>
<tr>
<td>John</td>
</tr>
<tr>
<td>Elsa</td>
</tr>
</table>
ReactDOM.render(myelement, document.getElementById('root'));
`}
Result:
The Root Node
The root node is the HTML element where you want to display the result.
It is like a container for content managed by React.
It does NOT have to be a <div> element and it does NOT have to have the id='root':
Display the result in the <header id="sandy"> element:
import React from 'react';
import ReactDOM from 'react-dom/client';
ReactDOM.render(<p>Hallo</p>, document.getElementById('sandy'));
React JSX
What is JSX?
JSX stands for JavaScript XML.
JSX allows us to write HTML in React.
JSX makes it easier to write and add HTML in React.
Coding JSX
JSX allows us to write HTML elements in JavaScript and place them in the DOM without any createElement() and/or appendChild() methods.
JSX converts HTML tags into react elements.
You are not required to use JSX, but JSX makes it easier to write React applications.
Here are two examples. The first uses JSX and the second does not:
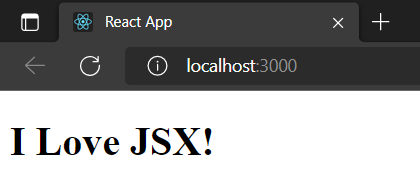
Example 1
JSX:
import React from 'react';
import ReactDOM from 'react-dom/client';
const myElement = <h1>I Love JSX!</h1>;
const root = ReactDOM.createRoot(document.getElementById('root'));
root.render(myElement);
result:
Example 2
Without JSX:
import React from 'react';
import ReactDOM from 'react-dom/client';
const myElement = React.createElement('h1', {}, 'I do not use JSX!');
const root = ReactDOM.createRoot(document.getElementById('root'));
root.render(myElement);
result:

the first example, JSX allows us to write HTML directly within the JavaScript code.
JSX is an extension of the JavaScript language based on ES6, and is translated into regular JavaScript at runtime.
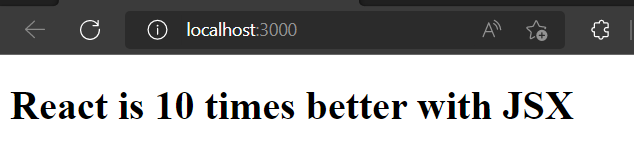
Expressions in JSX
With JSX you can write expressions inside curly braces { }.
The expression can be a React variable, or property, or any other valid JavaScript expression. JSX will execute the expression and return the result:
Example
Execute the expression 5 + 5:
import React from 'react';
import ReactDOM from 'react-dom/client';
const myElement = <h1>React is {5 + 5} times better with JSX</h1>;
const root = ReactDOM.createRoot(document.getElementById('root'));
root.render(myElement);
result:
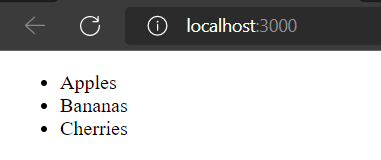
Inserting a Large Block of HTML
To write HTML on multiple lines, put the HTML inside parentheses:
Example
Create a list with three list items:
import React from 'react';
import ReactDOM from 'react-dom/client';
const myElement = (
<ul>
<li>Apples</li>
<li>Bananas</li>
<li>Cherries</li>
</ul>
);
const root = ReactDOM.createRoot(document.getElementById('root'));
root.render(myElement);
result:
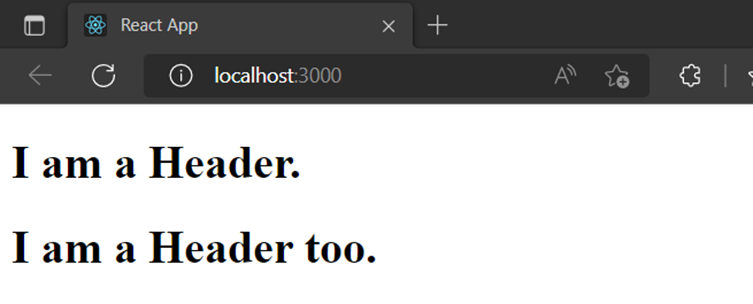
One Top Level Element
The HTML code must be wrapped in ONE top level element.
So if you like to write two paragraphs, you must put them inside a parent element, like a div element.
Example
Wrap two paragraphs inside one DIV element:
import React from 'react';
import ReactDOM from 'react-dom/client';
const myElement = (
<div>
<h1>I am a Header.</h1>
<h1>I am a Header too.</h1>
</div>
);
const root = ReactDOM.createRoot(document.getElementById('root'));
root.render(myElement);
result:
JSX will throw an error if the HTML is not correct, or if the HTML misses a parent element.
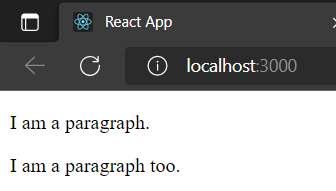
Alternatively, you can use a "fragment" to wrap multiple lines. This will prevent unnecessarily adding extra nodes to the DOM.
A fragment looks like an empty HTML tag: <></>.
import React from 'react';
import ReactDOM from 'react-dom/client';
const myElement = (
<>
<p>I am a paragraph.</p>
<p>I am a paragraph too.</p>
</>
);
const root = ReactDOM.createRoot(document.getElementById('root'));
root.render(myElement);
Result:
Elements Must be Closed
JSX follows XML rules, and therefore HTML elements must be properly closed.
Elements Must be Closed
JSX follows XML rules, and therefore HTML elements must be properly closed.
Example
Close empty elements with />
import React from 'react';
import ReactDOM from 'react-dom/client';
const myElement = <input type="text" />
const root = ReactDOM.createRoot(document.getElementById('root'));
root.render(myElement);
result:

JSX will throw an error if the HTML is not properly closed.
Attribute className=className
The class attribute is a much used attribute in HTML, but since JSX is rendered as JavaScript, and the class keyword is a reserved word in JavaScript, you are not allowed to use it in JSX.
Use attribute className instead.
JSX solved this by using className instead. When JSX is rendered, it translates className attributes into class attributes.
Example
Use attribute className instead of class in JSX:


