Use Of Line Weight And Colour Assignment Help
Use Of Line Weight And Colour In Plan, Elevation And Sections
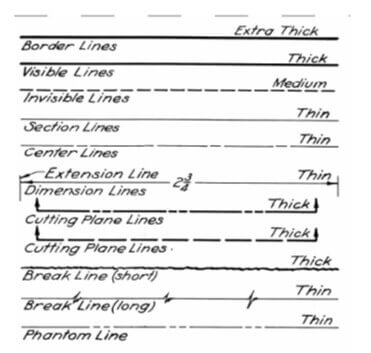
Types of lines: To make the drawing more expressive and easier to read, it should be presented in lines of different thickness and shape.
Line Weights
- HB, F/H (major/primary) cuts/profiles/ slices through spaces
- HB, F/H (secondary) elevations/corners/intersections of planes
- F/H, 2H, 4H (grid/layout/rendition) construction/layout/lines on planes/ textures
Use Of Line Weight And Colour Assignment Help By Online Tutoring and Guided Sessions from AssignmentHelp.Net
Line Type
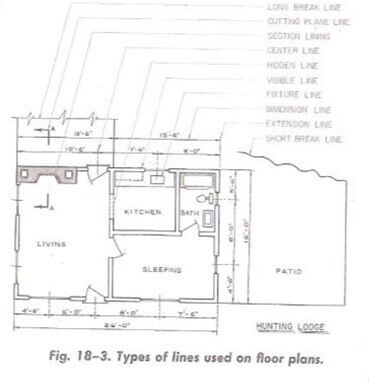
All lines should be clean-cut, opaque and of uniform width throughout their lengths. The various types of lines that are used are characterized as follows and are illustrated in Figure.

Center line- A thin line made up of long and short dashes, alternately spaced and consistent in length, beginning and ending with a long dash. Center lines cross each other without voids. Very short center lines may be unbroken if there is no possibility of confusion with other lines. (Use: To indicate the axis of a part of feature, a path of motion, or the theoretical line about which a part or feature is symmetrical.)
Dimension line- A thin line the same width as the center line, terminating in arrowheads at both ends and unbroken except where the dimension is placed. (Use: to indicate the extent and direction of a dimension.)
Leader line- A thin line the same width as the center line, terminating in an arrowhead or dot. An arrowhead should always terminate at a line. Generally, a leader line should be an inclined line except for a short horizontal portion extending to mid-height of the first or last letter or digit of the note. (Use: To indicate a part or portion of a drawing to which a number, note, or reference applies.)
Break line- A thin line with freehand zigzags for long breaks, or a thick freehand line for short breaks. (Use: To show an area or portion of a part that has been removed to show internal detail, to limit a partial section or view, or to eliminate repeated detail.) Extension line- A thin, continuous line that does not touch the outline of the object. (Use: To extend points or planes to indicate dimensional limits.)
Platom line- A thin line consisting of single long and double short dashes, alternately and evenly spaced, with a long dash at each end. (Use: To show alternate positions of parts, relative positions of adjacent parts shown for reference, or to eliminate repeated detail.)
Section Line- A thin, continuous line usually drawn at a 45-degree angle. (Use: To indicate surfaces exposed by a section cut.)
Hidden line- A thin line of short dashes (approximately 1/8 inch long), closely and evenly spaced. It is less prominent than an outline or a visible line. A hidden line begins and ends with dashes in contact with the lines that define its endpoints. (Use: To show hidden features of a part.)
Outline or visible line- A thick line, usually the most prominent one on a drawing. (Use: For all lines on the drawing representing visible edges or lines of an object.)
Cutting plane or viewing plane line- A thick line ending with arrowheads drawn at 90 degrees to the cutting or viewing plane line, to indicate the viewing direction. (Use: A cutting plane line indicates the plane in which a section is taken; a viewing plane line indicates the plane from which a surface is viewed.)


