COSC 4323 Project 2
In this project, you are going to learn one-point perspective, two-point perspective, three-point perspective, some rules of taking good photographs, and perspective transformation and rectification.
Part 1. Nowadays taking digital photographs is as easy as point and click. Everyone can do it. However, not everyone can take good pictures. There are rules and principles for taking good pictures. There are many photographs of building exteriors and interiors online. The following are some examples. Some are taken by professionals and some are taken by amateurs. Some are good and some are bad.

TO DO: Use your judgment, label each of the above pictures as good and bad, and explain the reason.
Part 2. Study the concept of one point perspective, two point perspective and three point perspective.
The image taken by a camera is the central projection of the 3D world onto a 2D plane. Suppose we have a building with three family of parallel lines along x, y and z direction.
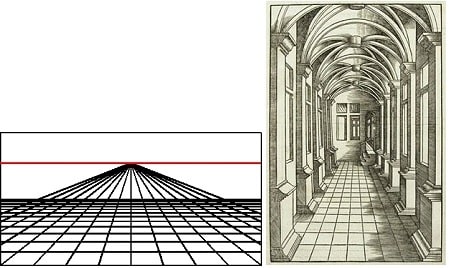
In one point perspective, there is only one vanishing point. That is, only one family of parallel lines (along z direction) converge to one point in the image (called vanishing point).
The following of examples of one point perspective.

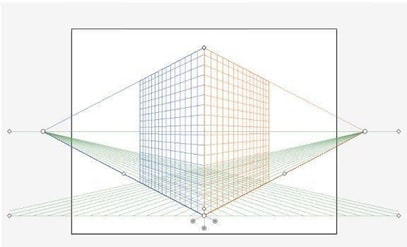
In two point perspective, there are two vanishing points (the lines along x direction converge to one vanishing point, the lines along y direction converge to one vanishing point). The vertical lines (z direction) remain parallel and do not converge. The following is an example of two point perspective.

In three point perspective, all three families of lines converge to three vanishing points. This happens when the camera is not level (shooting up or shooting down). This is most often the case when we shoot the high rise buildings from nearby, or look down from the top of the high building. The following is an example of three point perspective, in which the vertical lines also converge to one vanishing point.

TO DO: In Fig. 1 through Fig. 12, label each photograph as one point perspective, two point perspective, or three point perspective.
Part 3. The perspective of an image can be changed using projective transformations. This reflects the change of the view angle. The projective transformation can be expressed using mathematical formulas. The fundamental theorem of projective geometry states that a projective transformation in a projective plane is uniquely determined by the images of the four points in general positions (meaning no three points are on the same line).
Some image editors provide projective transformation tools. You can select four points (a quadrangle) and drag the four points to new positions. This is used for perspective rectifications.
When shooting the interior, (and many times the exterior) of a building (especially in real estate images), a practical rule says “Keep the verticals vertical.” That is, keep the camera leveled, and do not use three point perspective. Do not make the vertical lines converge! When you shoot a picture of the interior or exterior of a building, you can use the vertical lines of the frame of the camera display and make sure the vertical lines of the object is parallel to the frame edges. Some cameras even have the grid lines in the preview display, which you can turn on from the menu. When you judged the pictures in Fig. 1 through Fig. 12, you should have realized that many of them violate this rule.
If you have a bad perspective when shooting the picture, the perspective can be corrected in digital light room using image editing software. This is called perspective rectification.
TO DO: Use Photoshop, or GIMP, or any software of your choice, to perform perspective rectification of the images in Fig. 1 through Fig. 12 that you identified as bad images earlier.
